
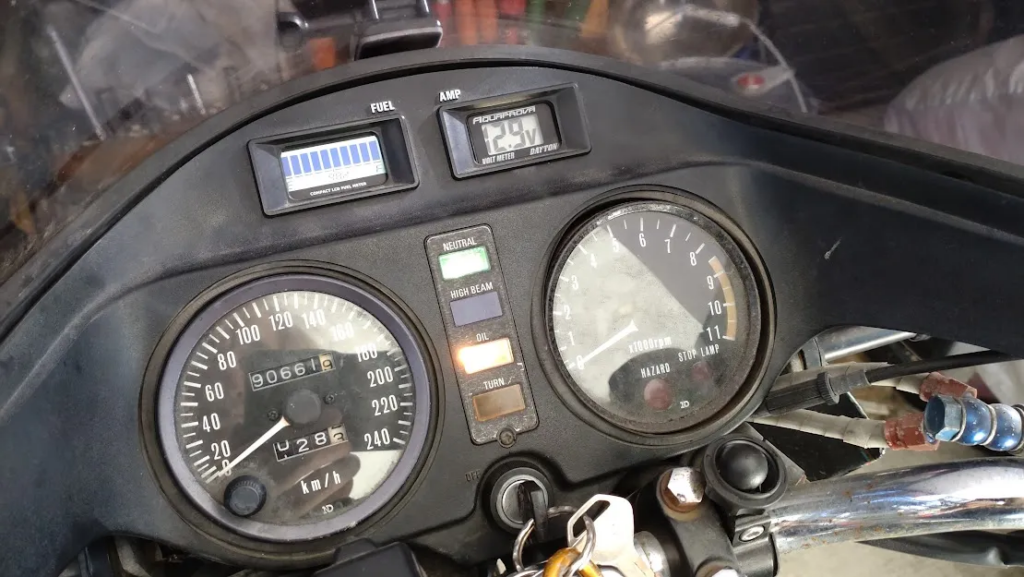
タイトルの通り、今回はアナログの燃料計をデジタル化しようという試みです。
As the title suggests, this time I’m attempting to digitize the analog fuel gauge.
電圧計をリファインした頃から構想はあったんだけど、優先順位が低かったので手つかずのまま。
I had this idea since I refined the voltmeter, but it remained untouched due to its low priority.
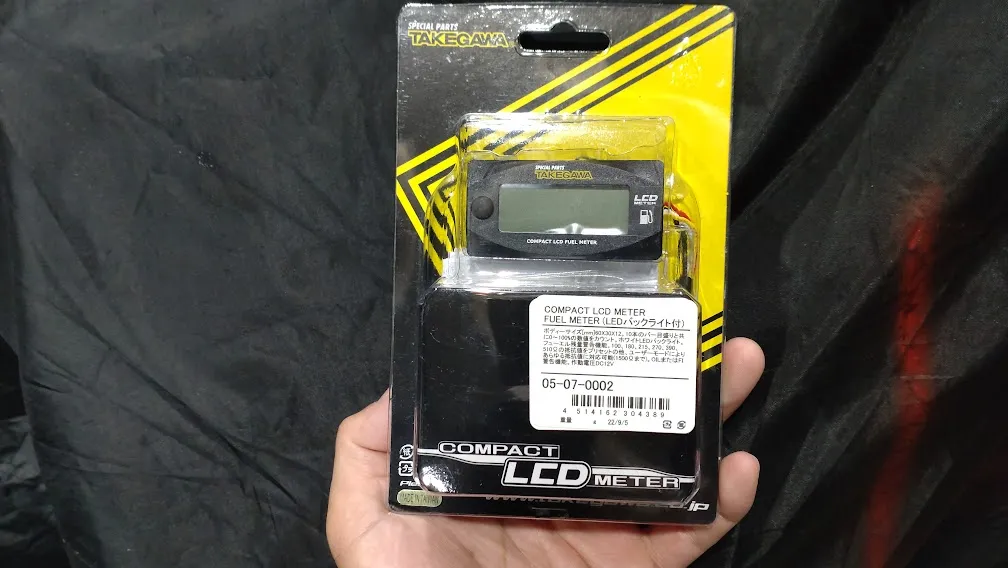
どんなのがいいか物色していて、見つけたのがSP武川の汎用燃料計。
While searching for a good option, I found SP Takegawa’s universal fuel gauge.
コンパクトLCDフューエルメーター
Compact LCD Fuel Meter
Checking the Size サイズの確認
話は前後しますけど、こういうのは購入してから「サイズが合わない」と大騒ぎしても後の祭りなので、購入前にしっかりと採寸するのが大事。
To avoid the hassle of finding out “the size doesn’t fit” after purchase, it’s crucial to measure properly before buying.
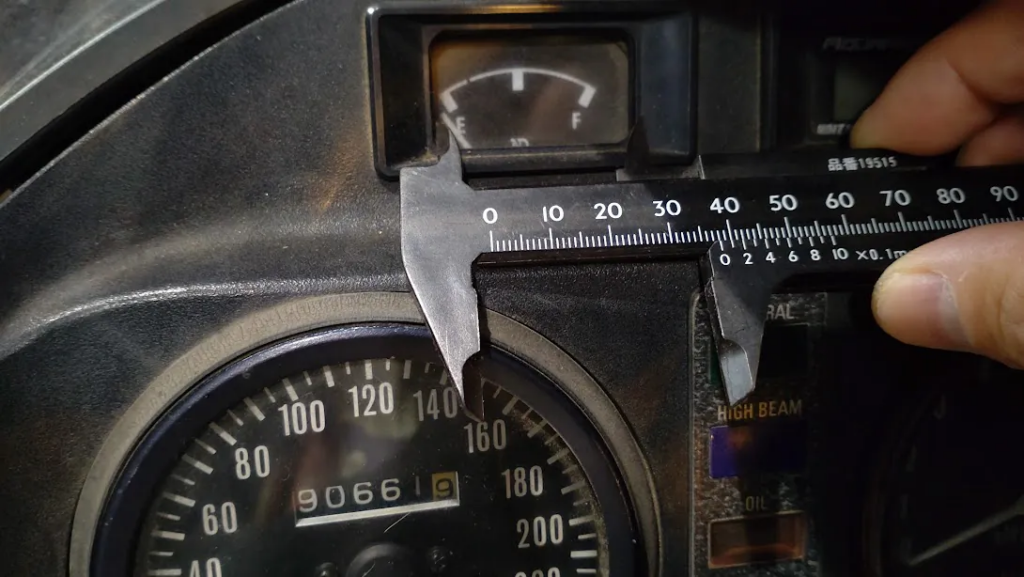
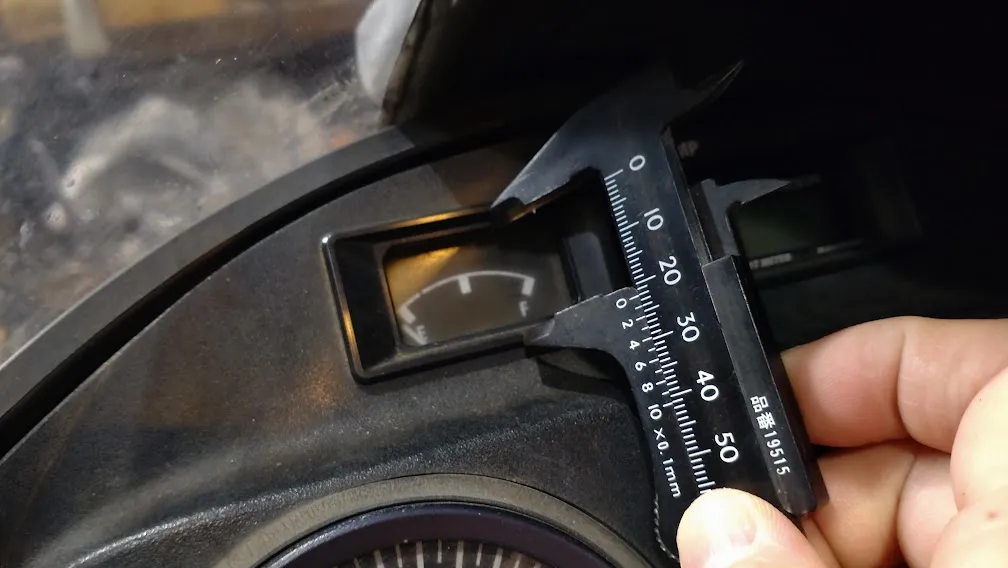
1~2mmくらい大丈夫でしょう…と思ってはいけない。
You shouldn’t think that a difference of 1-2mm is fine.
こういう小さいパーツの差は、たとえ1mmでも結構大きい。
Even a difference of 1mm can be significant for such small parts.
おおよそ問題なさそう、問題があってもどうにかできそう、と思ってから発注しましょう。
Only place an order when you’re sure there won’t be any major issues or when you can deal with potential problems.
Unboxing and Installation 開封の儀と取り付け作業
大丈夫そうだったので購入。
It seemed fine, so I bought it.
続けて、メーターパネルを外していきます。
Next, Remove the meter panel.

インジケーターのカバーを外すと、球に直接アクセスできる仕様。
Removing the indicator cover allows direct access to the bulbs.
だが、ゴムのブッシュでやんわりとはまっているだけだから、この状態で球の交換は非常に困難。
However, since they are softly fitted with rubber bushes, changing the bulbs in this state is very difficult.
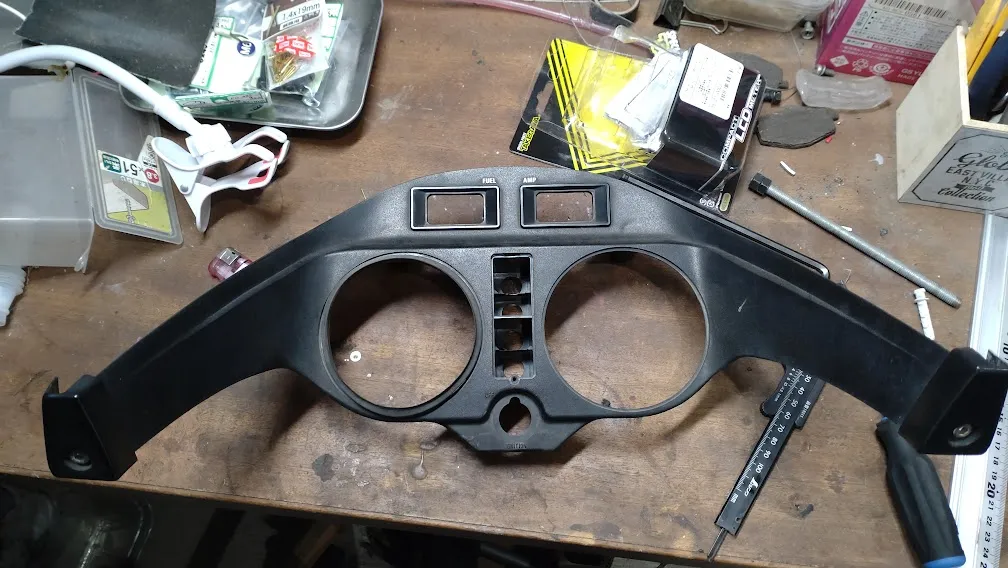
このパネルも今や貴重品。
This panel is now one of the rare items.
大昔、オーストラリアで崖から落ちた時、メチャクチャになってしまいました。
A long time ago, it got completely messed up when I fell off a cliff in Australia.
これは帰国してから買った純正品…1990年代は未だ純正品がたくさん売っていましたな。
I bought this original part after returning to Japan… In the 1990s, there were still many original parts available.
剥き出しになった内部。
The exposed interior.
開けてみて思い出したが、4つのインジケーターを再度パネルに戻すのは至難の技。
Opening it reminded me that reinstalling the four indicators LED into the panel is extremely difficult.
大丈夫だろうか。
I wonder if it’ll be okay.
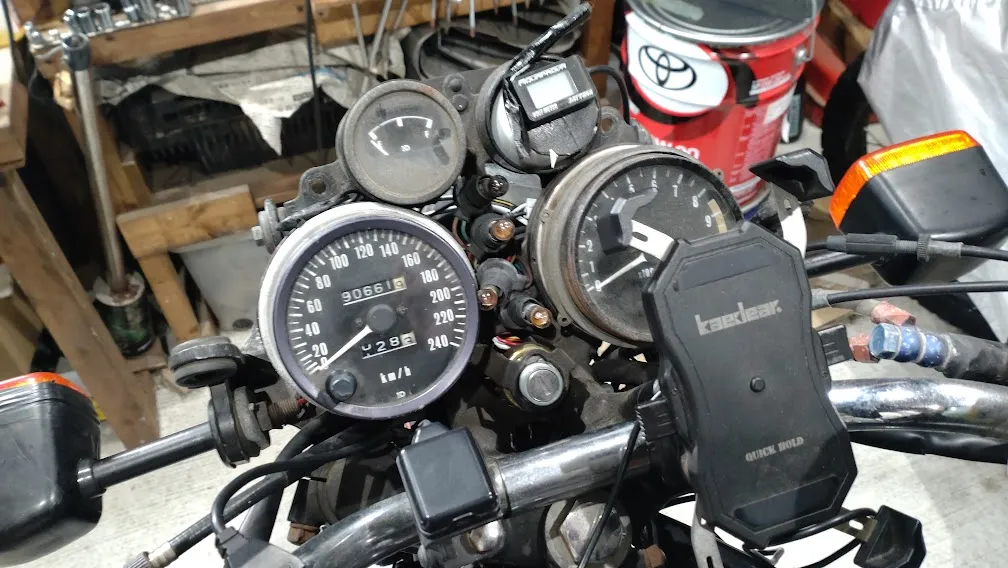
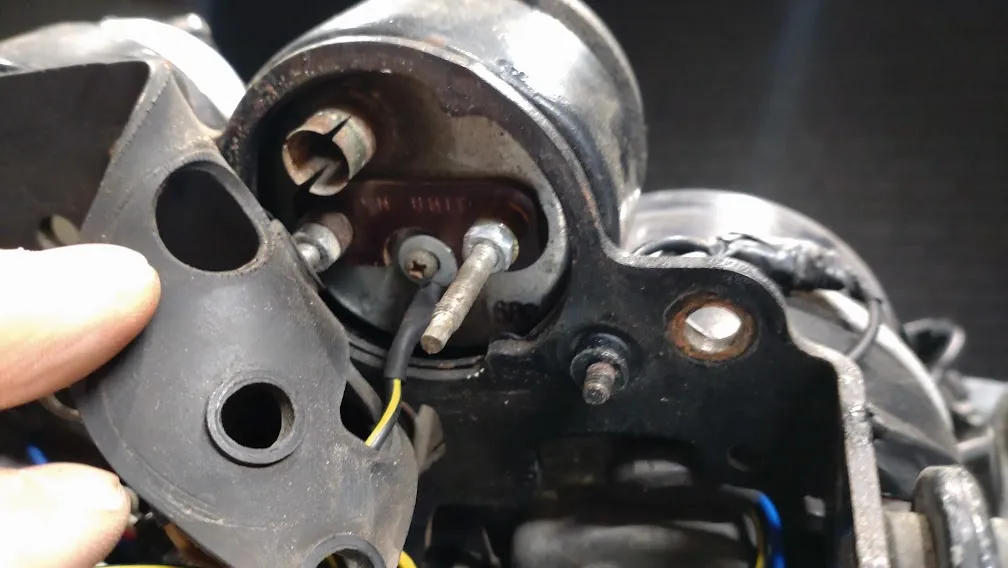
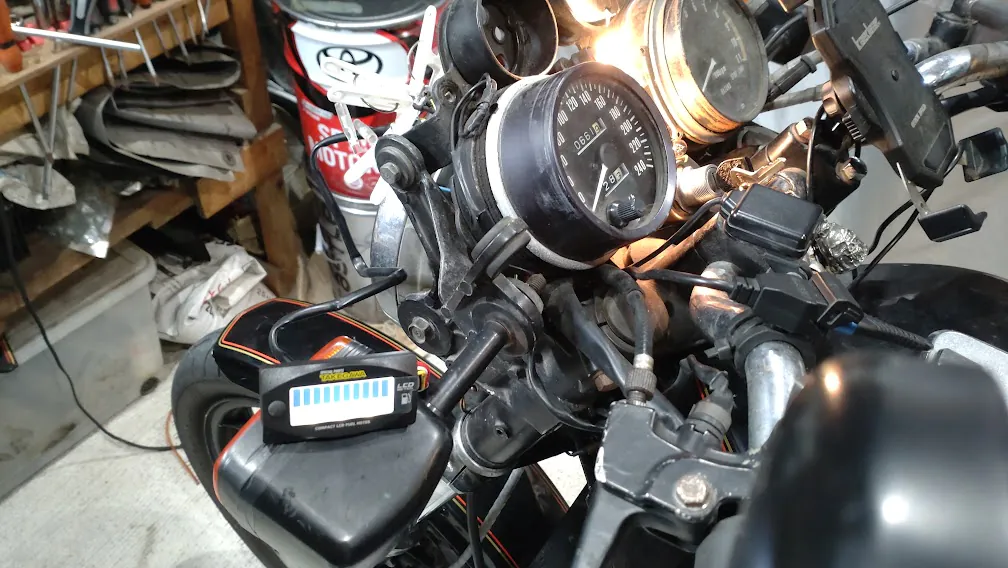
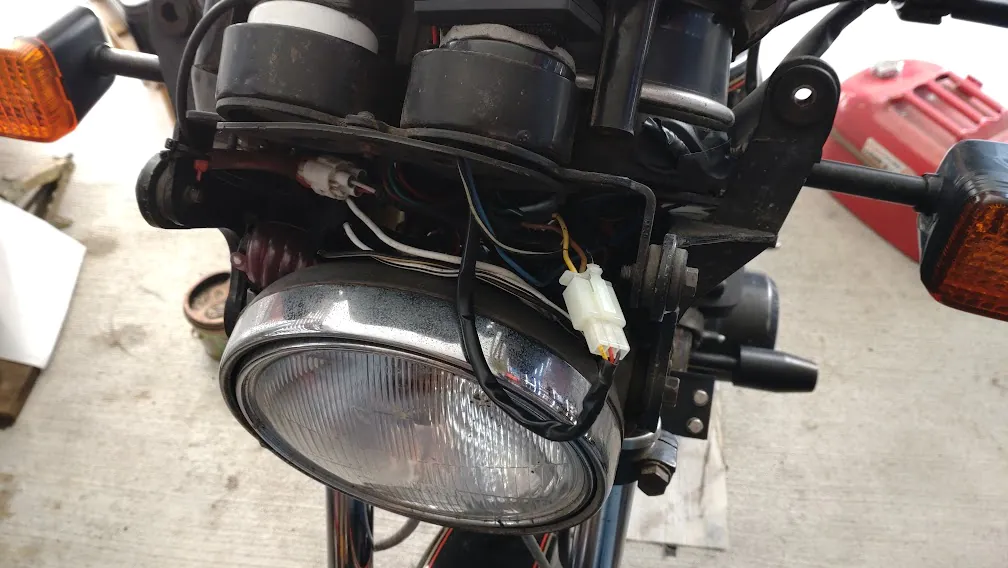
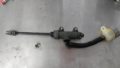
燃料計を摘出。
Removing the fuel gauge.
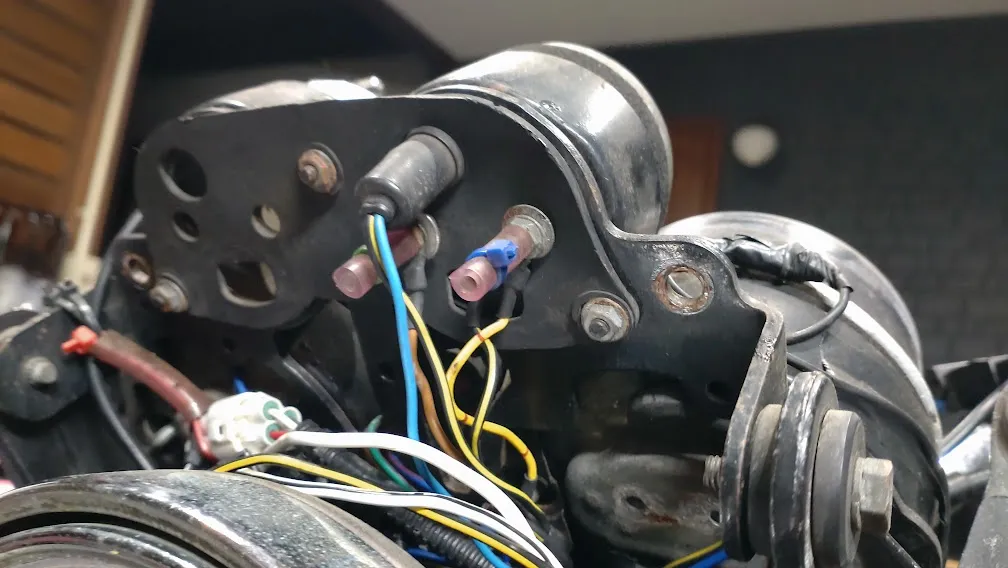
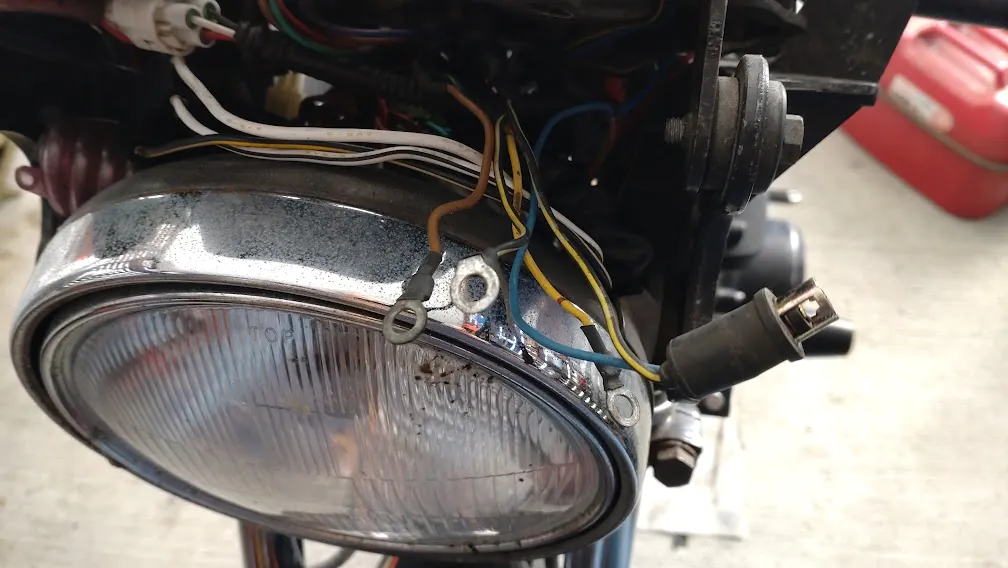
黒いブーツがついた配線は青と黒/黄、照明とアースなので、他のメーター球と同じ。
The wires with black boots are blue and black/yellow, for the illumination and ground, same as other meter bulbs.
茶色は電源(ACC)、黄色っぽいのが燃料計のセンサーと直結。
Brown is the power (ACC), and the yellowish one is directly connected to the fuel gauge sensor.
ピンク色の燃料ホースは絶縁体のつもり(笑)。
The pink fuel hose is meant as insulation (lol).
何故なら端子が剥き出し仕様だから。
That’s because the terminals are exposed.
純正だとブーツか何かついてる?
Does the original come with boots or something?
もはや覚えてすらいないけど、すごいつくり。
I don’t even remember anymore, but it’s quite a setup.
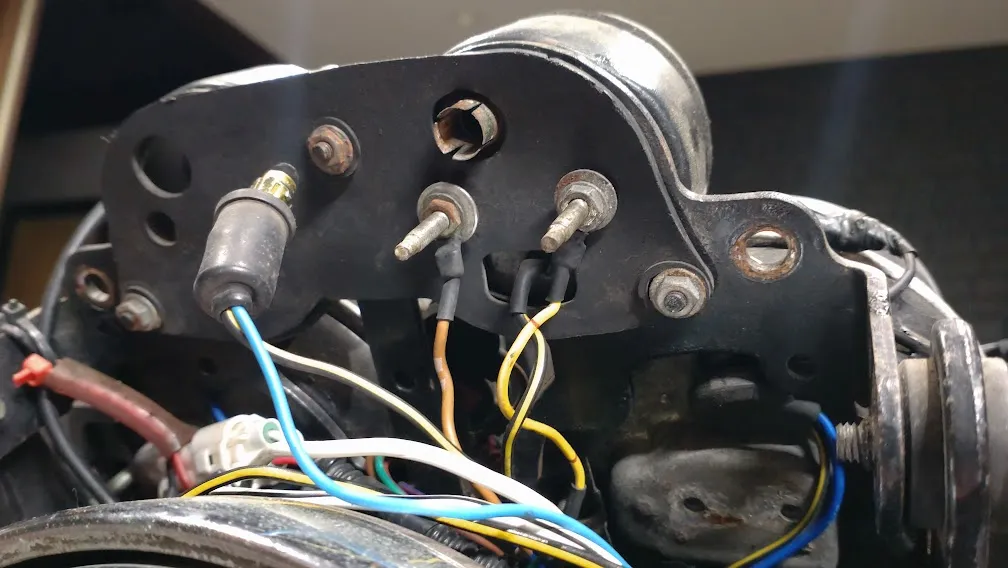
おまけに、この小さなナットが曲者
On top of that, this small nut is tricky.
車両で使うサイズじゃない(笑)。
It’s not a size you’d use on a vehicle (lol).
ラバーのカバーも小さなナットで止まっている…
The rubber cover is also held by small nuts…
せめて8mmにしてほしいけど、しょっちゅう開ける場所じゃないので、受入れるしかない。
I wish it were at least 8mm, but since it’s not a frequently opened place, I’ll have to accept it.
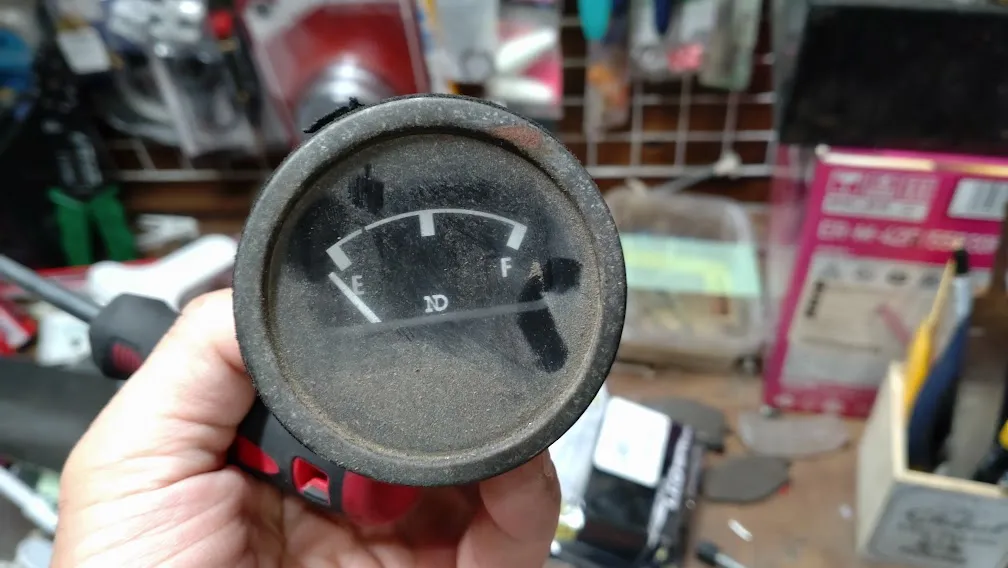
摘出した燃料計。
The extracted fuel gauge.
25年間ありがとうございました。
Thank you for 25 years of service.
ちなみに、動いていないわけじゃないので、綺麗に掃除して飾っておきましょうか。
By the way, it still works, so maybe I’ll clean it up and display it.
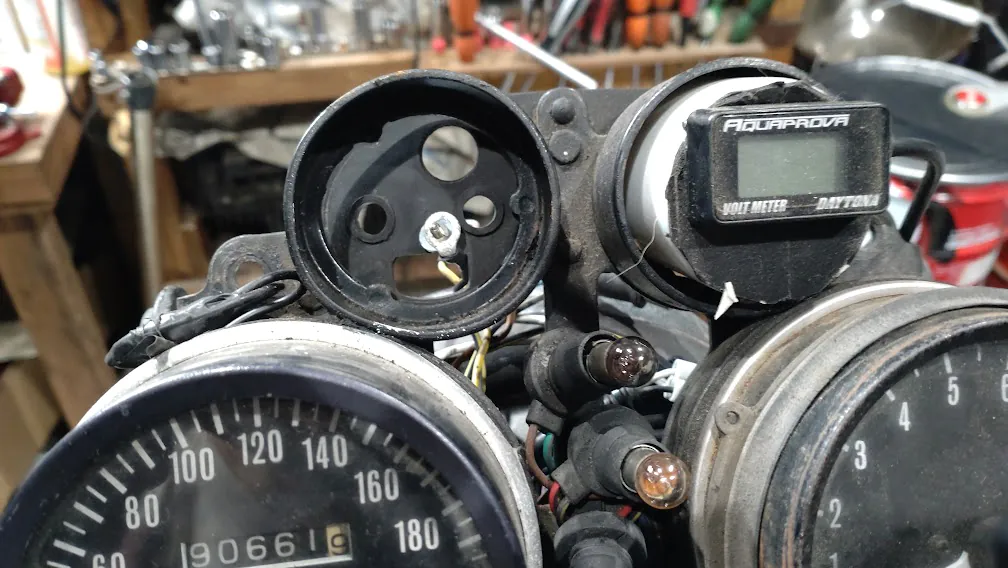
引っこ抜いた跡。
The aftermath of the removal.
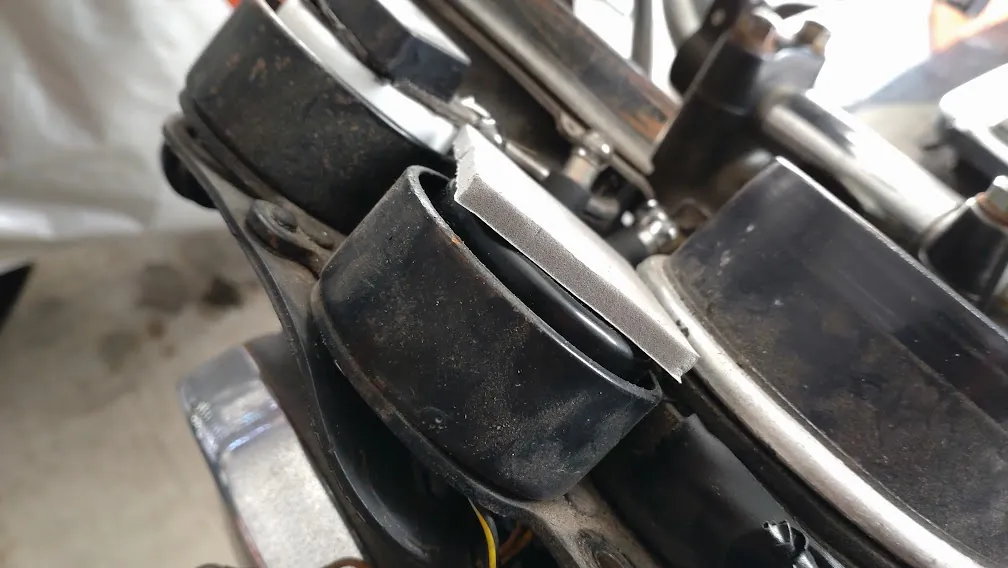
ハイビームの電球が切れていたので、ついでに交換。
The high beam bulb was burnt out, so I replaced it as well.
20年近く前に購入した12Vのスタンレー電球が、まだ半分くらい残ってる。
I still have about half of the 12V Stanley bulbs I bought nearly 20 years ago.
この電球こそLEDにしたらいいのにね。
These bulbs should really be replaced with LEDs.
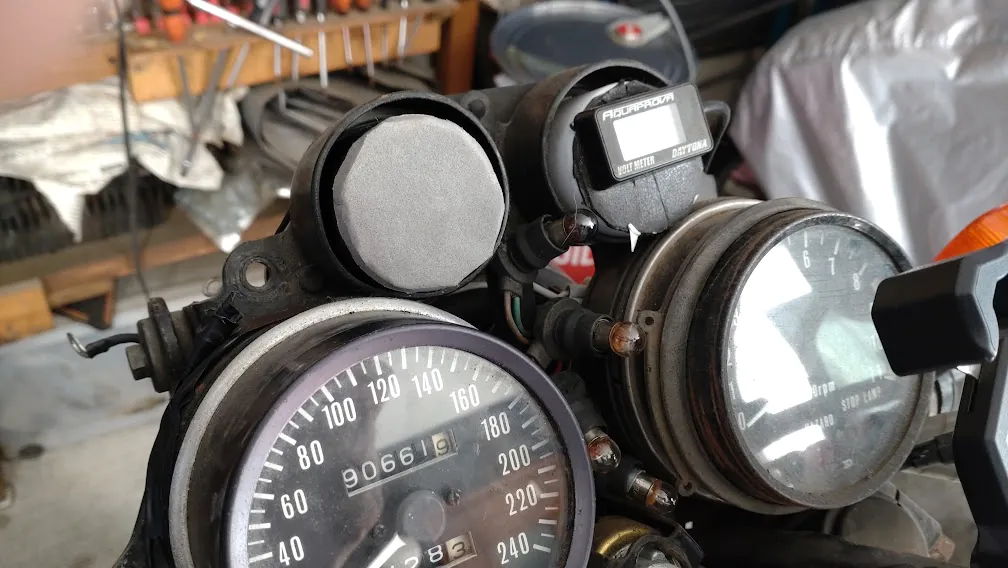
フライング気味だけど、完成予想図。
A bit premature, but here’s a preview of the final look.
窓にピッタリのサイズでしょう?
It’s the perfect size for the window, right?
持続可能な何とかを目指すなら、こういう細かいところも共通サイズにしていってくれると、面倒くさがりなDIYライダーにはありがたいわけです。
If we’re aiming for sustainability, making such small parts a common size would be great for lazy DIY riders like me.
ここから先はメーターの固定方法をどうするか、考えないといけない。
From here, I need to figure out how to fix the meter.
イカした素材も、器具もないDIYサンメカにとって、できるだけポンづけに近いやり方で取り付けたい。
For a DIYer without cool materials or tools, I want to install it as close to a direct fit as possible.
ちなみに電圧計をつけた時は、これ。
When I installed the voltmeter, I used this.
2016年11月05日 Z1Rの電圧計を交換してみた
November 5, 2016: Replacing the Voltmeter on the Z1R
Z1Rの電圧計として以前購入した激安製品はダメになったので、DAYTONAの高級電圧計を装着。
The cheap voltmeter I bought earlier for the Z1R failed, so I installed a high-end Daytona voltmeter.
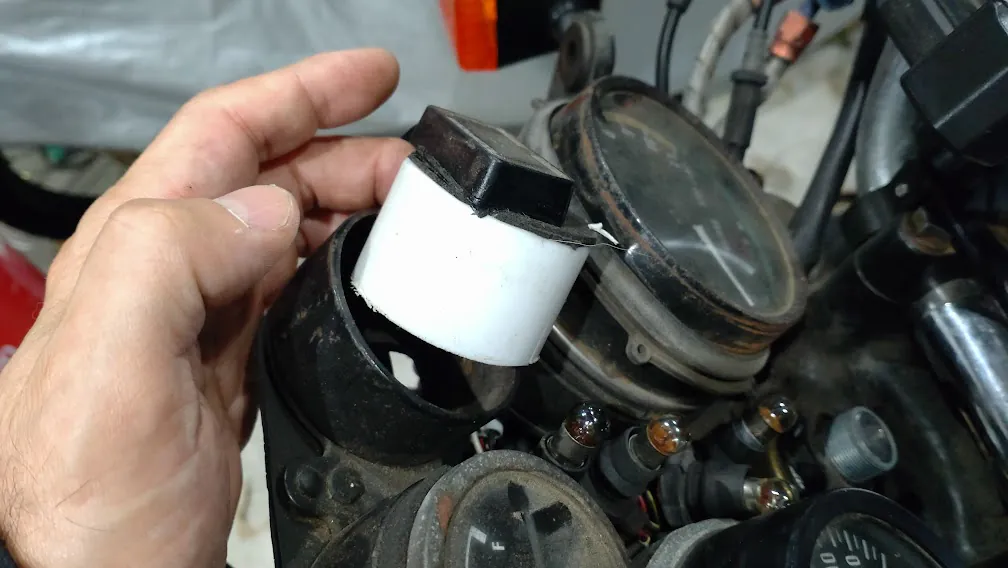
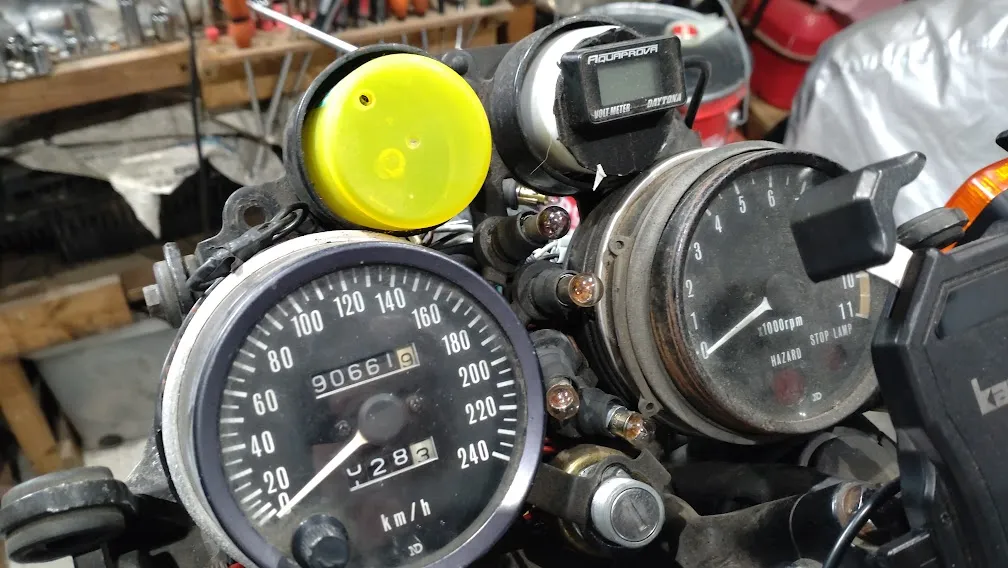
スプレーの蓋を流用。
I reused a spray can lid.
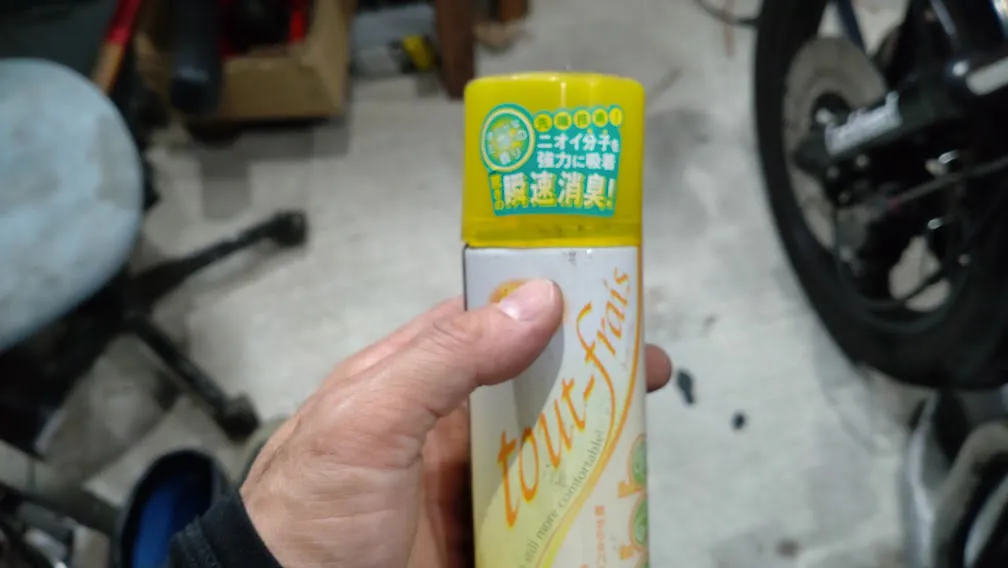
というわけで、今回も…棚にあった消臭剤スプレー
So this time too… I used a deodorant spray can from the shelf.
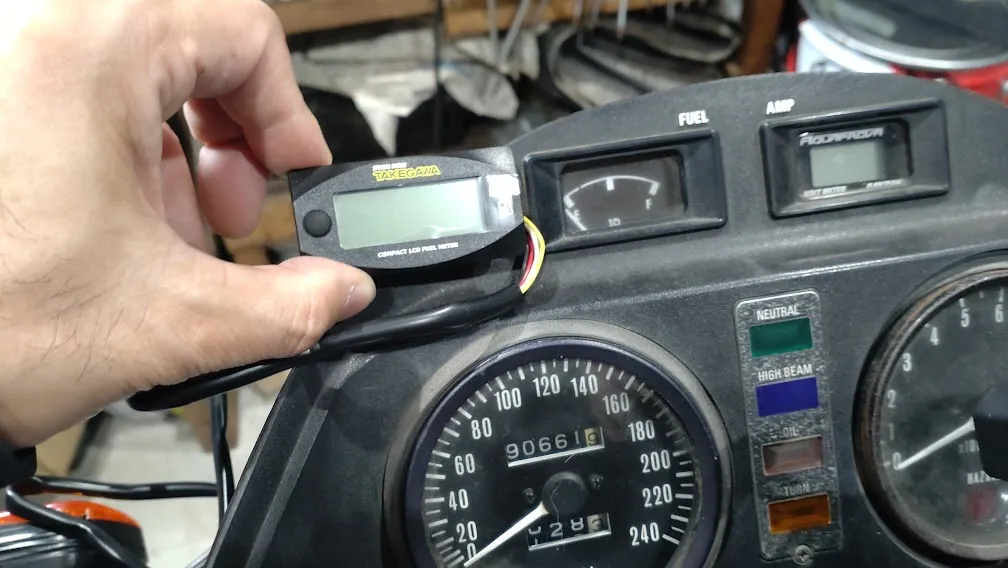
Operation Check 動作確認
サイズ的には申し分ありませんが…
The size is perfect, but…
「こうやって貧乏くさいパーツでバイクをカスタムしていると、売値がどんどん下がっていくよ」
“If you customize your bike with such cheap-looking parts, the resale value will keep dropping,”
と言われたかどうかは別として、ちょっと見た目がアレなので別のモノにします。
Whether I was told that or not, it looks a bit off, so I’ll use something else.
といっても、どうせここは見えないんだけどね。
Though, it’s not visible anyway.
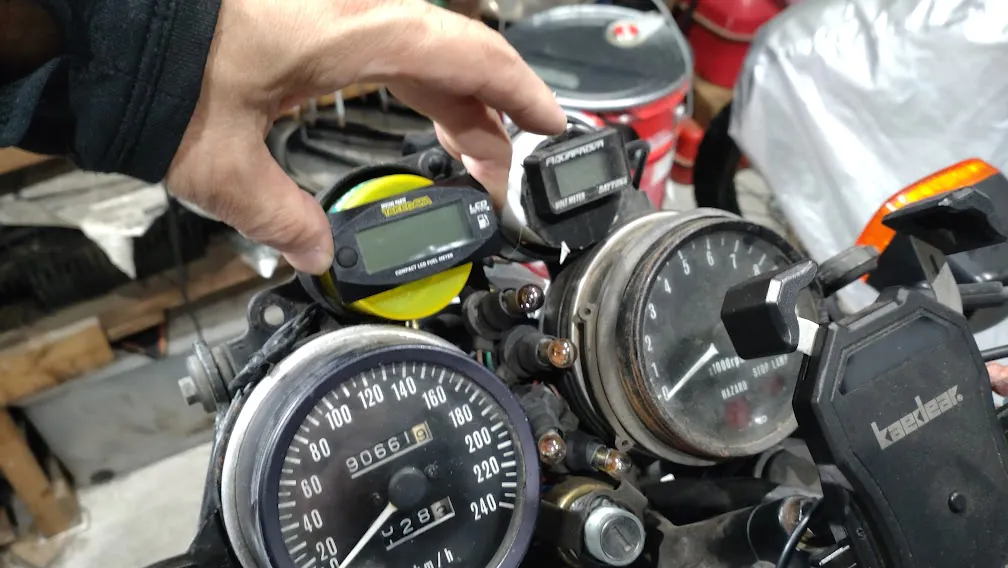
そんなことよりも、大事なのは動作確認
More importantly, I need to check if it works.
洗濯ばさみで配線を繋いでスイッチオン。
I connected the wiring with clothespins and turned on the switch.
無事に表示されました!
It displayed successfully!
さあ、ここからが大変。
Now, the real work begins.
燃料計を設定しなければなりません。
I have to set up the fuel gauge.
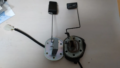
そもそも、燃料計がどうやって残量を表示させているのか。
First, how does the fuel gauge display the remaining fuel?
現行車両はどうなっているか分からんけど、ガソリンタンクの内部にフロート(浮き)が入っていて、これがガソリンの量に応じて上下する。
I’m not sure about current vehicles, but inside the gas tank is a float that moves up and down according to the fuel level.
センサーは可変抵抗器がついてて、フロートが上がり切れば抵抗値が最小になり、フロートが沈み込めば抵抗値が最大になる。
The sensor has a variable resistor; when the float is at its highest, the resistance is at its minimum, and when the float sinks, the resistance is at its maximum.
Z1Rの場合は、こんな感じ。
For the Z1R, it’s like this.
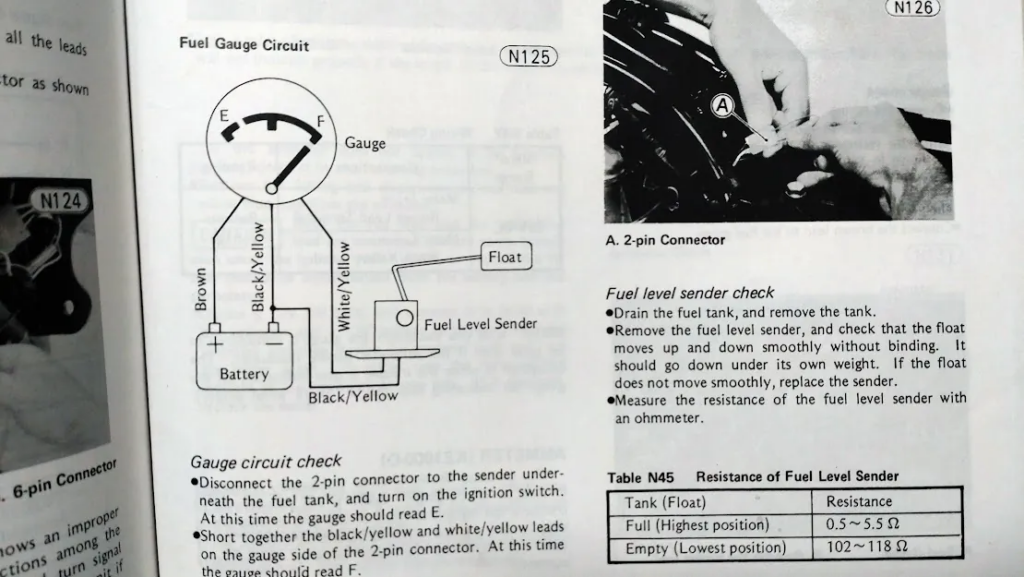
満タンで0.5~5.5Ω、空で102~118Ω。
0.5-5.5Ω when full, 102-118Ω when empty.
前に計測した時は規定値に収まっていたのだが、はたして今回はどうでしょう…
When I measured it before, it was within the specified range, but let’s see how it is this time…
これが満タン時。
This is when full.
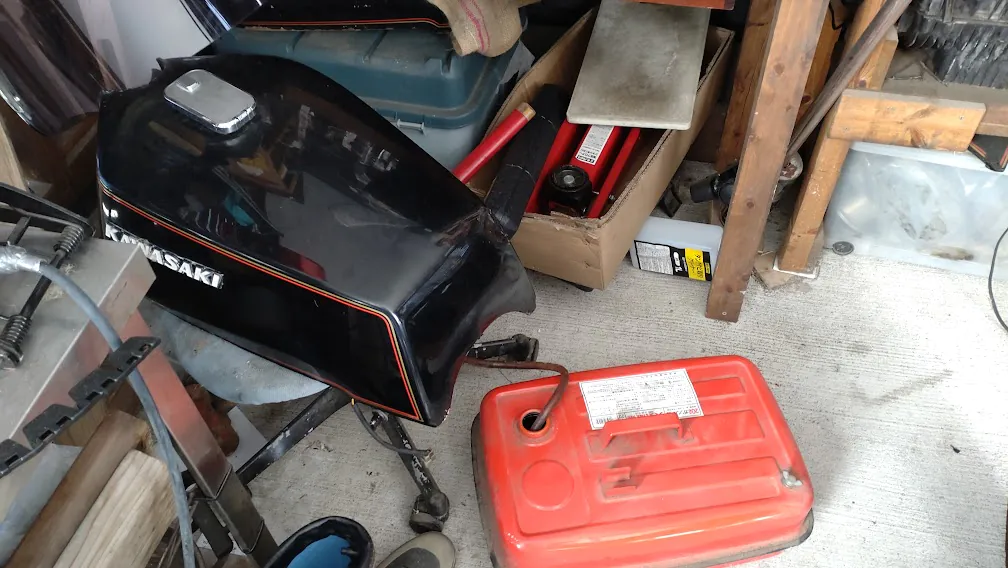
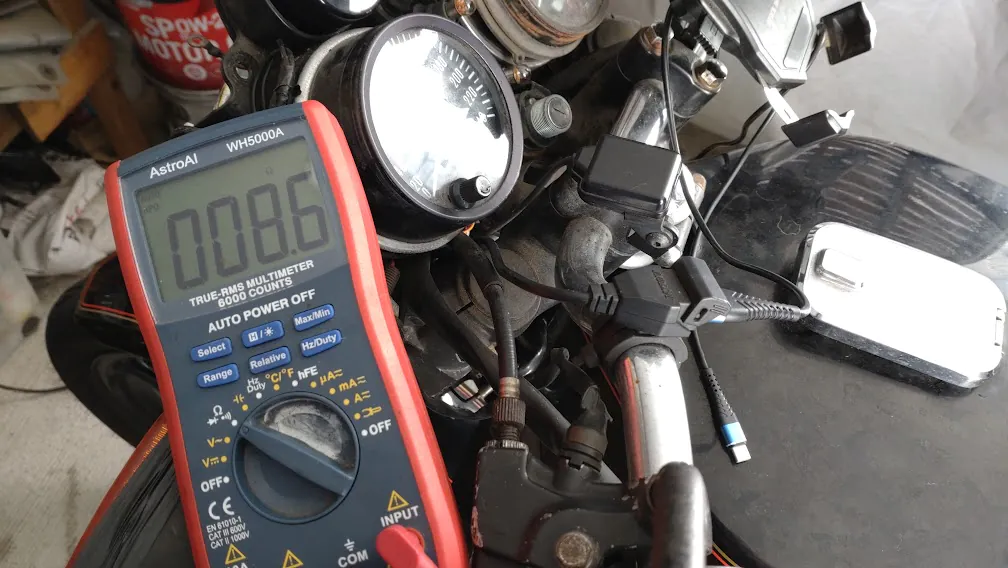
ガソリンを抜いて、空の状態で抵抗値を再計測。
I drained the fuel and re-measured the resistance when empty.
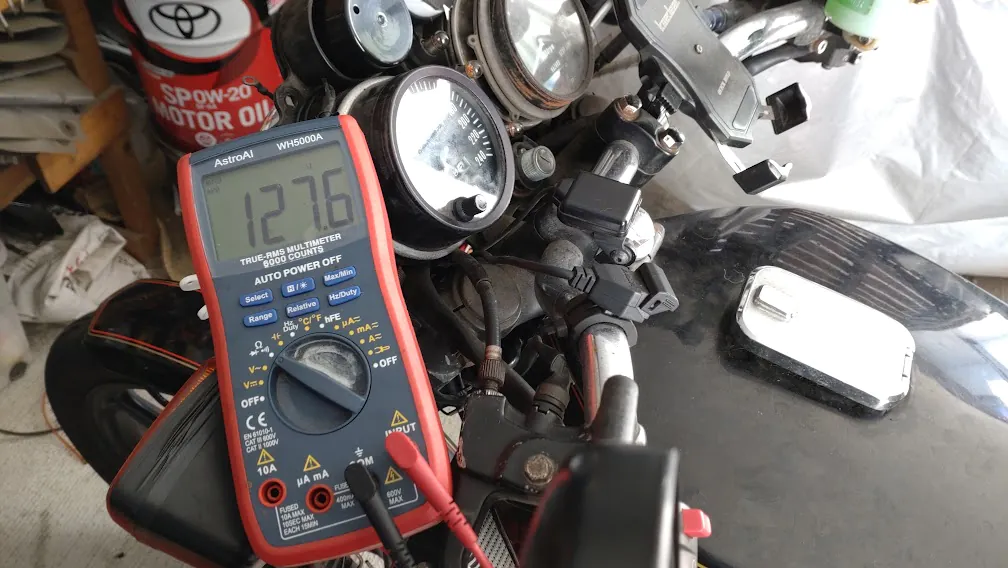
127.6Ωになっている。
It’s 127.6Ω.
この値を燃料計に入力してやると、それを読み取ってナンボ入っているかを指し示してくれるのだが…
Entering this value into the fuel gauge will let it read and indicate how much fuel is in the tank, but…
おそらく、燃料センサー(部品名は、フューエル・ゲージ・センダー)の可変抵抗がおかしいことになっているのでは。
The variable resistor in the fuel sensor (part name: fuel gauge sender) is probably malfunctioning.
そのせいで、空なのに満タン表示になったり、何やらおかしい感じ。
That’s why it sometimes shows full when it’s empty, or acts strangely.
これ、本当は配線とか設置を終わらせてから、コツコツやりたいんだけど、設定用のボタンが画面のすぐ脇についているから、組みつける前にやらんとアクセスできないという…
Ideally, I’d like to finish the wiring and installation first, but the setup button is right next to the screen, so I have to do it before assembly.
コンパクトLCDフューエルメーターは抵抗値を設定しないと使えない。
The compact LCD fuel meter won’t work without setting the resistance values.
が、マニュアルの表現がちょっと分かりづらい。
However, the manual’s explanation is a bit unclear.
簡単に言えば、4ケタなので1番左側の値が1000の位。
Simply put, it’s a four-digit number, so the leftmost digit represents the thousands.
設定できるのは1~1500Ωまでだけど、小数点以下は無いので満タン時8.6Ωなら8か9に合わせる。
You can set it from 1 to 1500Ω, but since there’s no decimal point, set it to 8 or 9 if it’s 8.6Ω when full.
この作業がチマチマと時間がかかる。
This process takes a while.
Wiring Process 配線加工
でも、飽きっぽいので「とりあえず組みつけからやろう」ということに(笑)。
But since I get bored easily, I decided to “assemble it first” (lol).
使用するサブハーネスを引っ張り出して、ちょん切ってやる。
I pulled out the sub-harness I’ll use and cut it.
製品にはギボシ端子が付属しているけど、3本だの4本だの使う時はカプラが良いかと。
The product comes with bullet terminals, but using a connector is better when dealing with 3 or 4 wires.
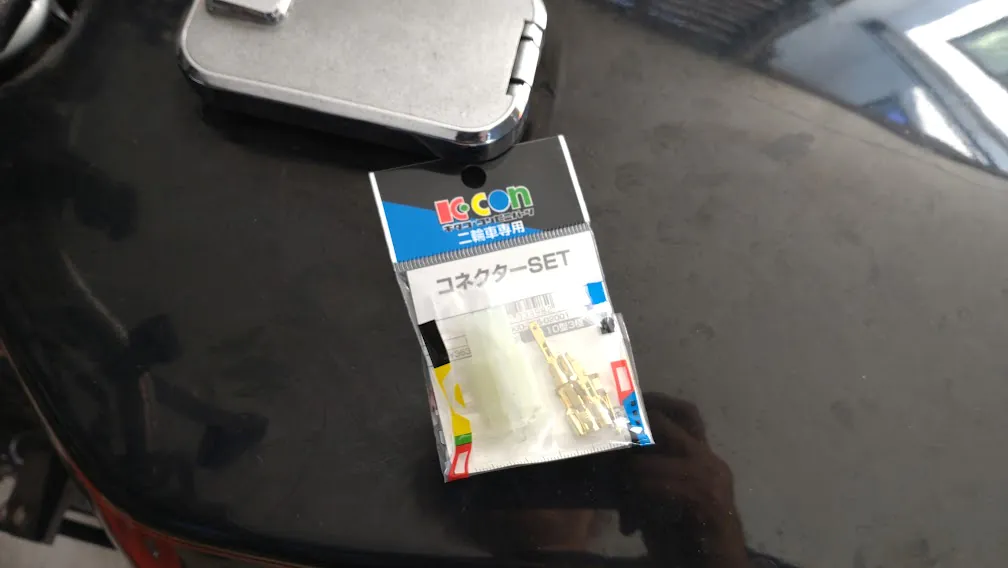
大きいのは収納性が悪いので、かさばらない小さいものを。
Since large ones are difficult to store, use smaller, less bulky ones.
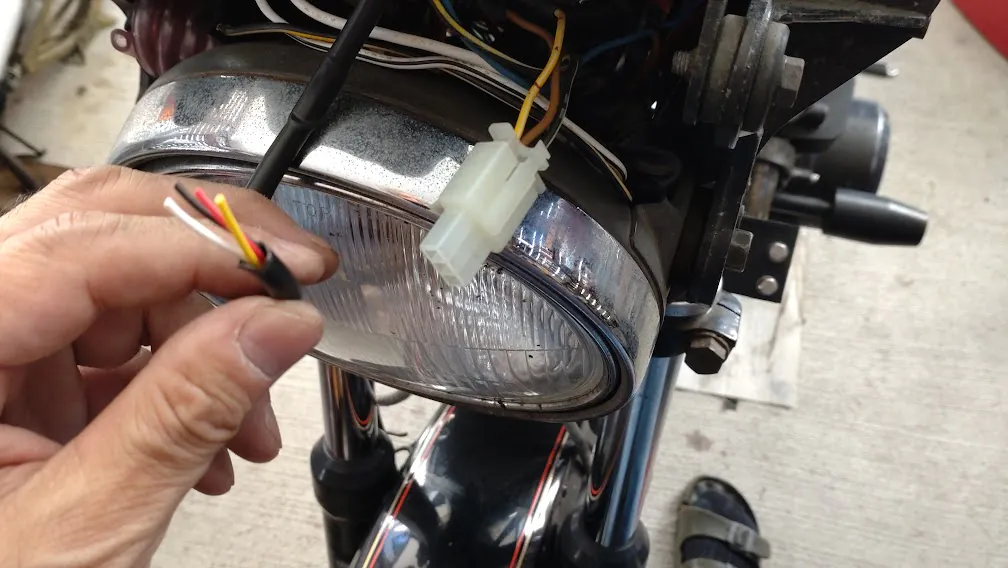
車体側を取り付けたら、製品側を。
After attaching the vehicle side, attach the product side.
そうそう間違えることは無いと思うけど、違うこと考えながら作業すると、配線の位置を間違えてしまうことも。
I don’t think I’ll make many mistakes, but if I get distracted, I might mix up the wiring positions.
このくらい小さいカプラだと、やり直すのがエラい大変なのでよく確認しましょう。
With such small connectors, redoing them is quite difficult, so double-check.
相変わらずチキってハーネスを長めにしてますけど、本来はジャストサイズが良いです。
I’m still playing it safe by making the harness longer, but it should ideally be just the right size.
そして、実は端子をカシメる時、やや汚くなってしまいました(涙)。
And the terminals got a bit messy when I crimped them (tears).
悪い工具じゃなかったんだけど、そろそろガタがきてるので買い替えます。
The tools weren’t bad, but they’re getting old, so it’s time to replace them.
配線を終わらせたらマウント加工。
After finishing the wiring, I’ll process the mount.
黒いスプレーのフタを用意して、リジットを少し抑制するためクッションシートを貼り付ける。
I prepared a black spray can lid and attached a cushion sheet to reduce rigidity.
こんな感じで全面に貼り付けてやる。
I attached it like this all over.
高さを調整して極端にテンションがかからないよう、うまいこと高さを調整してやる。
I adjusted the height so that it doesn’t put excessive tension.
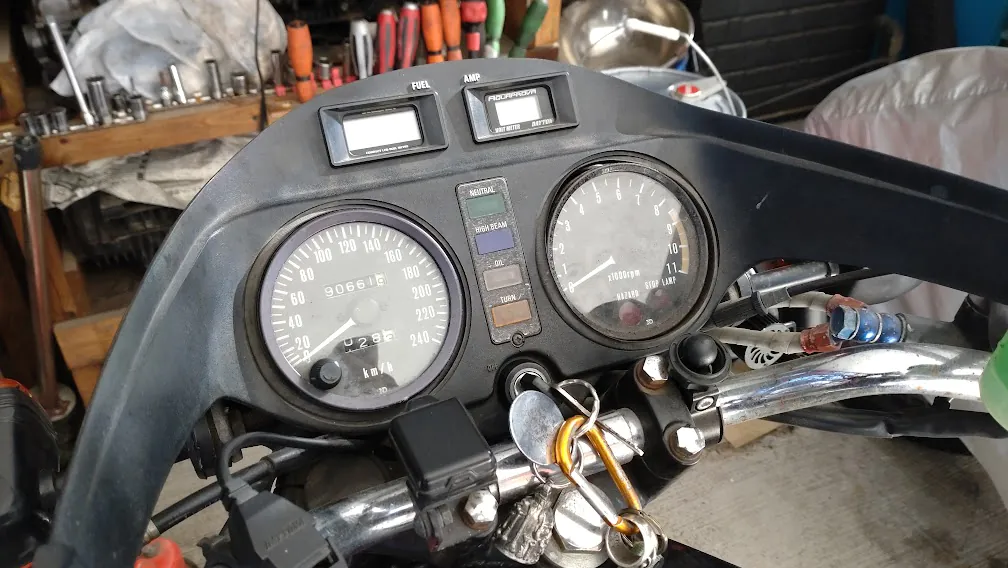
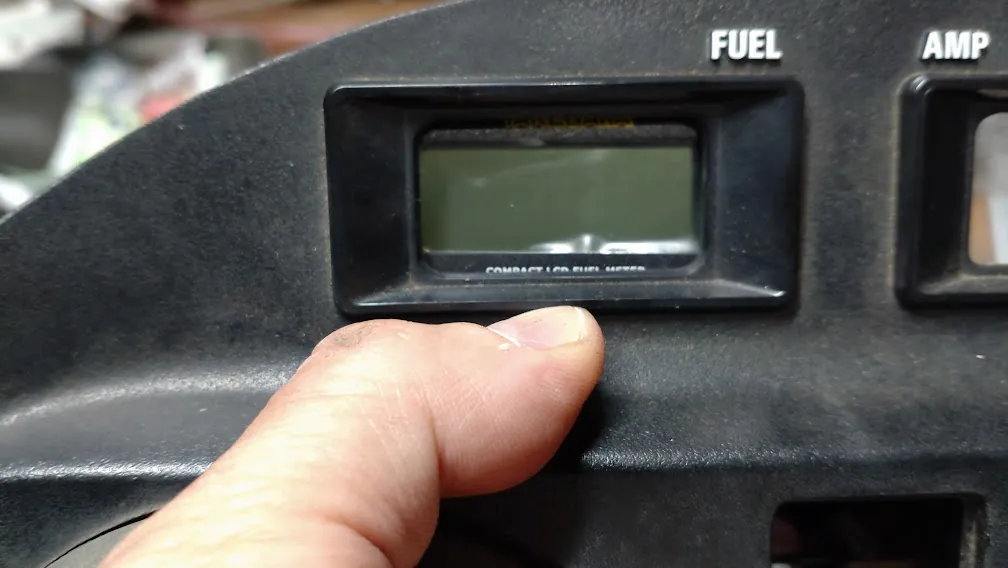
無事、コンパクトLCDフューエルメーターがおさまりました。
The compact LCD fuel meter fit in nicely.
表示も全く問題なし。
The display works perfectly.
で、実際走り出してみると、走行中にフロートが上下するせいか、これをつぶさに読み取ってしまう。
But when I actually started driving, it seemed to read every movement of the float while driving.
アナログの燃料計もそうなんだけど、それがイマイチ信用できないというか…
Analog fuel gauges do this too, but they’re a bit unreliable…
イキオイでやってしまったけど、多分、ちゃんと動作させるためには燃料センサーを新調しないとダメなんじゃないだろうか…それで、設定も活きるというものではないかと…
I did it impulsively, but to make it work properly, I probably need to replace the fuel sensor… only then will the settings be effective…
不人気車なうえ、カスタムしている方々はインジケーター取っ払ってしまっているので、少しも参考にならない作例になりました(笑)。
Since it’s an unpopular model and those who customize it often remove the indicators, this ended up being a not-so-helpful example (lol).
コメント