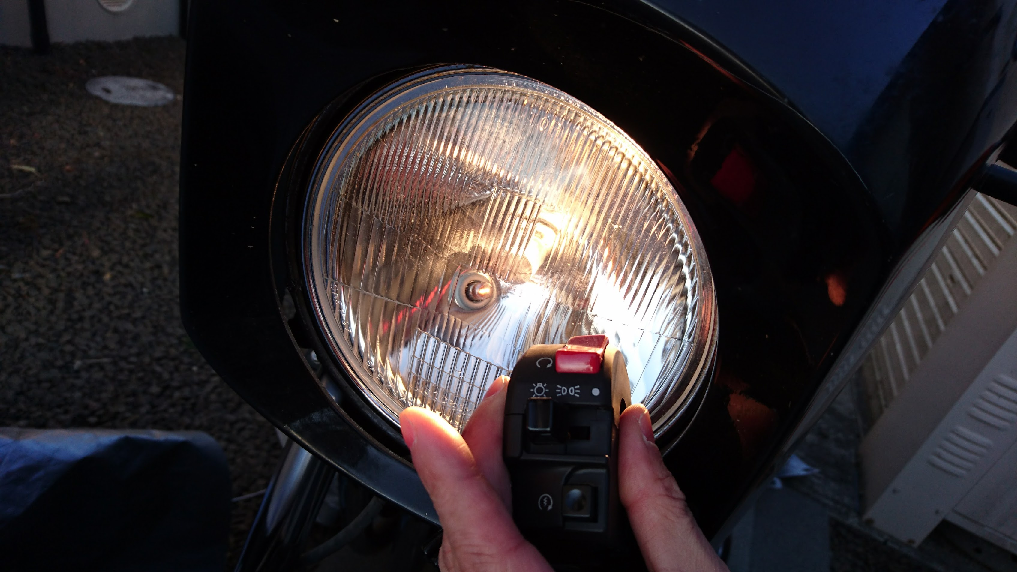
今回のお題は「スロットル」「右ハンドルスイッチ」の交換です。
The topic this time is the replacement of the “throttle” and “right handle switch.”
機能的には特に問題なかったのですが、ハンドルを目いっぱい切った時、タンクに干渉するんですよね。
Functionally, there was no particular problem, but when I turned the handle all the way, it interfered with the tank.
スチール製のパーツも錆びてきたし。
The steel parts were also getting rusty.
90年代、空冷Zカスタムの定番は「社外ハイスロ+YAMAHA OW-01スイッチ」でした。
In the 90s, the standard custom for air-cooled Z was “aftermarket high throttle + YAMAHA OW-01 switch.”
パワーユニットもボア・アップ、ハイリフト・カムで出力を上げ、フラット・バルブのキャブをおごり、ド派手なマフラーを組む。
The power unit was also upgraded with a bore-up, high-lift cam, a flat-valve carburetor, and a flashy exhaust.
足周りは、小口径ハイグリップタイヤに負けない他車種のフォークやスイングアームを搭載。
For the chassis, forks and swingarms from other models were installed to match the small-diameter high-grip tires.
まさに豪華絢爛。
Truly luxurious.
部品代の合計金額がベース車輛価格を上回っていた例もあったかと…
There were even cases where the total cost of the parts exceeded the base vehicle price…
2000年代、次第に純正部品をさり気なく使い、耐久性を重視したカスタムが増えてきたのは単なるトレンドなのか。
In the 2000s, the trend gradually shifted towards using genuine parts subtly and focusing on durability.
それとも景気後退でユーザーの懐事情が悪くなったせいか。
Or maybe it was because the economic downturn worsened the financial situation of users.
ところで「OW-01」は、YAMAHA FZR-750のことです。
By the way, “OW-01” refers to the YAMAHA FZR-750.
ハイスロに見合う幅の狭いスイッチ(3FV-83963-00)は、当時、他になかったんですね。
There were no other narrow switches (3FV-83963-00) that matched the high throttle at that time.
その後、あちこちでコピー品が販売されたので、すごい需要だったんでしょう。
Later, copies were sold everywhere, so there must have been significant demand.
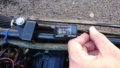
【スロットルとグリップ】
Throttle and Grip
ポピュラーなのが、ゆるいRを描いて2本平行に出るタイプ。
The popular type is one where two parallel lines are drawn in a loose R shape.
ワイヤーとの境目にブーツを履いてるような。
It looks like it wears boots at the boundary with the wire.
KawasakiだとKLX(D-トラッカー)やZX系の奴がそうですね。
For Kawasaki, it’s the ones like KLX (D-Tracker) or ZX series.
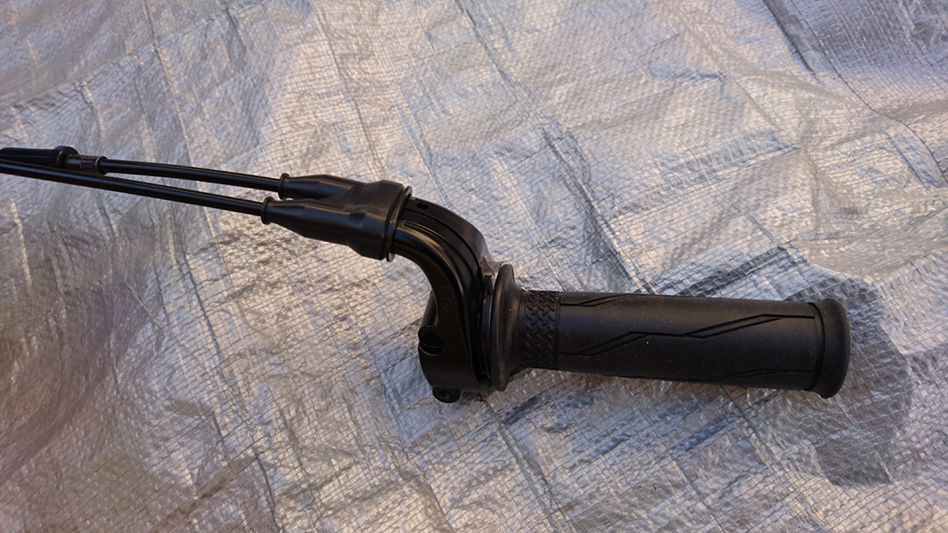
どんなのがいいのか画像検索しまくって調べたら、YAMAHA YZF-R6の純正スロットルがいいんじゃないかと。
After extensively searching for images, I thought the genuine throttle of the YAMAHA YZF-R6 might be good.
レーサーレプリカ R6のパーツだけあって、相当のハイスロらしいのです。
Since it’s a part of the racer replica R6, it seems to be quite a high throttle.
我が家のZにはあまり関係ないですけど(笑)。
Though it doesn’t matter much for our Z (laugh).
メリットとしては価格。
The advantage is the price.
Kawasakiより安いんですね。
It’s cheaper than Kawasaki.
2C0-26240-00 グリップアッセンブリ 1,404円
2C0-26240-00 Grip Assembly 1,404 yen
ヤマハ(Yamaha)
Yamaha
ヤマハ純正 グリップ アセンブリ 2C0-26240-00
Yamaha Genuine Grip Assembly 2C0-26240-00
2C0-26240-00
5VY-26281-00 キャップ,グリップアッパ 1,404円
5VY-26281-00 Cap, Grip Upper 1,404 yen
2c0-26282-00 キャップ,グリップアンダー 1,782円
2c0-26282-00 Cap, Grip Under 1,782 yen
90110-05018 ボルト,ヘキサゴンソケットヘッド 103円
90110-05018 Bolt, Hexagon Socket Head 103 yen
使用したのは、以上のパーツ。
The parts used are listed above.
日本では、デフレだの経済停滞だの騒がれていますが、純正部品に関してはそんなことありませんね。
In Japan, there is talk of deflation and economic stagnation, but this is not the case with genuine parts.
数カ月単位で部品価格が上がっている。
The prices of parts are increasing every few months.
バイク需要が伸びている、新興国の景気に引っ張られているのでしょうか。
Is it because of the growing demand for motorcycles and the economic boom in emerging countries?
景気が良くなって物価が上がれば、車輛価格も上がるでしょうし。
If the economy improves and prices rise, vehicle prices will also rise.
我々日本が取り残されているだけか。
Is it just that we in Japan are being left behind?
バイトの時給だって20年前の相場と大きく変らない。
Even the hourly wage for part-time jobs hasn’t changed much from 20 years ago.
驚きですよね。
It’s surprising.
次がワイヤー。
Next is the wire.
一体どれがいいんだろう。
Which one is the best?
作例をアレコレ参考にしながら、最終的に行きついたのが、KX250のワイヤーをチョイス。
After referring to various examples, I ultimately chose the wire from KX250.
ある方がブログで書いていたので、車種はまったく違いましたが参考にしてみました。
Someone wrote about it on their blog, so I used it as a reference even though the model was completely different.
若干長いらしいんだけど、短いよりはやり直しが効くんじゃないかという単純な理由。
The simple reason is that it’s said to be a bit long, but it’s better than being too short, as you can make adjustments.
買ったのはコレです。
This is what I bought.
54012-0156 2,840円
54012-0156 2,840 yen
結論から言うと失敗…(笑)。
In conclusion, it was a failure… (laugh).
長過ぎ。
Too long.
どう取り回してもおかしくなるし、電装系じゃないんだから取り回しで解決しちゃイカン!
No matter how you route it, it looks strange, and it’s not electrical wiring, so you can’t solve it with routing adjustments!
ちょっと長いくらいならワイヤーを切ってタイコを新造するくらいでよかったが、今回はダメ。
If it were just a bit long, cutting the wire and making a new end would have been fine, but not this time.
アウターもカットするので、末端処理が必要。
Since the outer cable needs to be cut, end treatment is required.
アクティブから出てるアジャスターキットで加工。
Process it with the adjuster kit from Active.
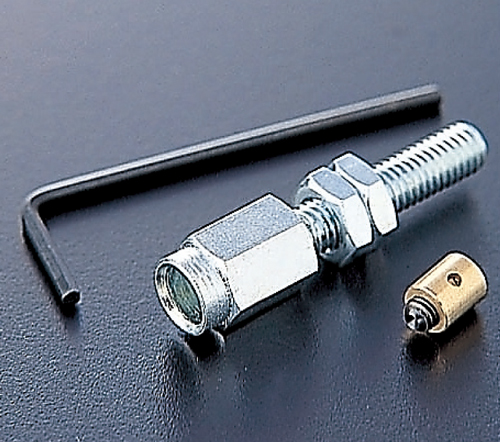
アクティブ(ACTIVE) スロットルワイヤーアジャスター 1060008
Active Throttle Wire Adjuster 1060008
【ハンドルスイッチ】
Handle Switch
せっかくスロットルを新調したんだから、スイッチも…というのが人情でしょう。
Since I replaced the throttle, it’s only natural to replace the switch as well…
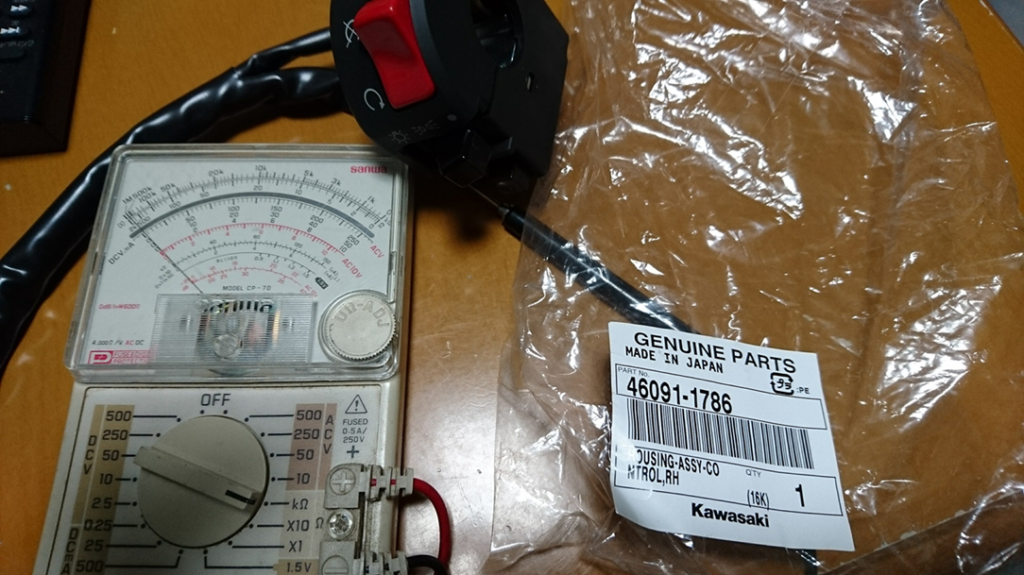
どうやらZX系のスイッチがフィットするようなので
It seems that the ZX series switch fits
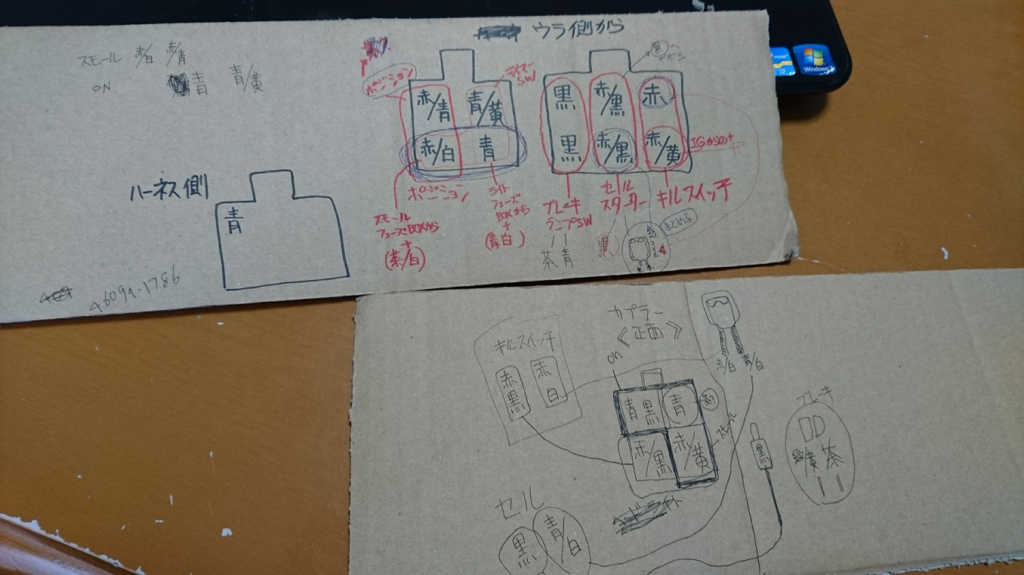
46091-1786
46091-1786
を購入。
was purchased.
自分の中ではZX-9Rのパーツがついたと認識。
I recognized it as a part from ZX-9R.
ちょうど購入した時、誕生日が近かったので(笑)。
It was close to my birthday when I bought it lol.
驚くべきことに8000円以上もするんですね。
Surprisingly, it costs over 8,000 yen.
昔は5,000円とか6,000円くらいで買えたんじゃないでしょうか?
Didn’t it used to be around 5,000 or 6,000 yen?
アフターパーツメーカーのボルトオン製品だと15,000円くらいしますからね。
Aftermarket bolt-on products cost around 15,000 yen.
お小遣いが制限されている身ですし、純正流用の最安コースを進みます。
Since my allowance is limited, I go for the cheapest course of using genuine parts.
基本的に以前やった左ハンドルスイッチのモディファイと同じです。
Basically, it’s the same as the modification I did with the left handle switch before.
スターター、キルスイッチ、ライトON/OFFなので左より楽かも。
It’s easier than the left because it’s just the starter, kill switch, and light ON/OFF.
カプラーは使えないのが分かっているのでじゃんじゃん外したいところですが、まずはテスターを当てます。
Since I know the coupler won’t fit, I want to remove it quickly, but first, I use a tester.
スイッチをパチパチやりながら、何がどうなっているのか解析します。
While flicking the switch, I analyze what’s happening.
空冷Zも水冷Zも、ハーネスの色は概ね同じです。
The harness colors are generally the same for both air-cooled and water-cooled Z.
何となくですが、間違うと大変な配線は目立たせてあって、どうでもいいのは黒っぽい色を使っている気がします。
Somehow, it seems that important wiring is made noticeable, while the less important ones use darker colors.
前にテスターの使い方、聞かれたことがあったので(ワタクシに聞くか?と思ったりもしたけど)ここで解説。
I’ve been asked before how to use a tester (though I wondered why they would ask me), so I’ll explain here.
スイッチをON/OFFする=電気が通じているかどうか、ということなので「抵抗値」を測定します。
Turning the switch ON/OFF means checking if electricity is flowing, so you measure the “resistance.”
ONだと抵抗値がゼロになり、OFFだと反応なし(断線と一緒)。
When ON, the resistance is zero; when OFF, there’s no response (just like a break).
たとえば、赤と白と青の線があって赤と白をテスターで繋いでスイッチをパチパチしても反応がない。
For example, if you have red, white, and blue wires, and you connect red and white with a tester and flick the switch but get no response.
赤と青でも無反応。
No response with red and blue either.
白と青をつないでパチパチしたら針が動いた。
If the needle moves when connecting white and blue and flicking the switch.
ということは、そのスイッチは、その二つの線に繋がっている、という。
It means that the switch is connected to those two wires.
たまに途中で分岐する線もありますけど、基本はそんな感じです。
Sometimes wires branch in the middle, but that’s basically how it works.
そうやって、何が何処に行ってるのか解析していきます。
That’s how you analyze where everything goes.
線の数が5本だろうと10本だろうと、やることは一緒です。
Whether there are 5 or 10 wires, the process is the same.
この手の作業は、めんどくさがらず、チマチマとやっていくのが吉。
For this kind of work, it’s best to do it diligently without cutting corners.
適当にやると、たいてい失敗します。
If you do it haphazardly, you’ll usually fail.
解析が終わったら、車体側のどのカプラー、ギボシと繋げるかを判断します。
Once the analysis is complete, determine which coupler or connector on the vehicle side to connect to.
車体に応じた配線図を見るか、カプラーの後ろから、わずかに見える配線の色を頼りに
Either look at the wiring diagram for the vehicle or rely on the color of the wires slightly visible behind the coupler.
「緑はウィンカーに行ってる…」
“Green goes to the indicator…”
「黒はアースっぽい…」
“Black seems to be ground…”
と調査を始めるのですが、ここまで書いたことを「フムフムなるほど」と思いながら読んでいる貴兄は、配線図つきのマニュアルを買ってください。
That’s how the investigation starts, but if you’ve been reading up to this point and think, “Hmm, I see,” then you should buy a manual with a wiring diagram.

車体側の配線とスイッチ側の配線が分かったら、それに合わせてカプラーなりギボシをつけていきます。
Once you understand the wiring on both the vehicle and switch sides, attach the appropriate couplers or connectors accordingly.
でも、念を押すなら、ショートに注意して、カプラーに直接端子を差して動作チェックします。
However, to be sure, be careful of shorts and check the operation by directly inserting terminals into the coupler.
理論上、電装は「合っている」「間違っている」の2種類しかないので、解析した通りに接続(結線)すればOKです。
Theoretically, there are only two types of electrical connections: “correct” and “incorrect,” so if you connect it as analyzed, it should be fine.
が、やはり人がやることなので間違いもあります。
But since it’s done by humans, mistakes can happen.
カプラーは一度端子を差してしまうと引き抜くのが面倒なので、念には念をというわけです。
Since it’s troublesome to remove terminals once they’re inserted into the coupler, it’s better to be thorough.
ちなみにそこそこ大きな電気が流れる箇所は、間にフューズを入れたテスト用の配線を間に挟めるのも吉です。
For places where a relatively large current flows, it’s also good to insert test wiring with a fuse in between.
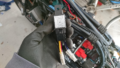
最終的には、こんな感じに。
Finally, it looks like this.
間違ってたら悪しからず。
Sorry if it’s wrong.
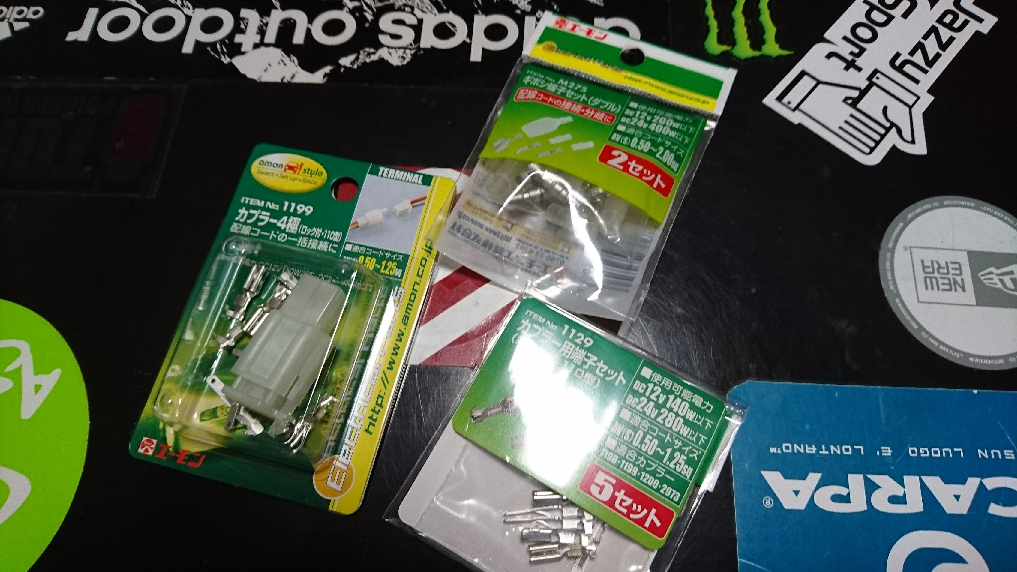
在庫が足りなかったので、ギボシだのカプラだのを買い足しました。
I had to buy more connectors and couplers because I didn’t have enough stock.
4Pカプラは、上の図にもあるように、使えそうで使えないので(オスメス逆)要注意。
Be careful because the 4P coupler, as shown in the diagram above, looks usable but isn’t (male and female are reversed).

配線加工は無事終了。
The wiring process is complete.
次はドキドキの臨床実験です。
Next is the nerve-wracking clinical test.
セルを回したり、キルスイッチを確かめます。
Turn the starter and check the kill switch.
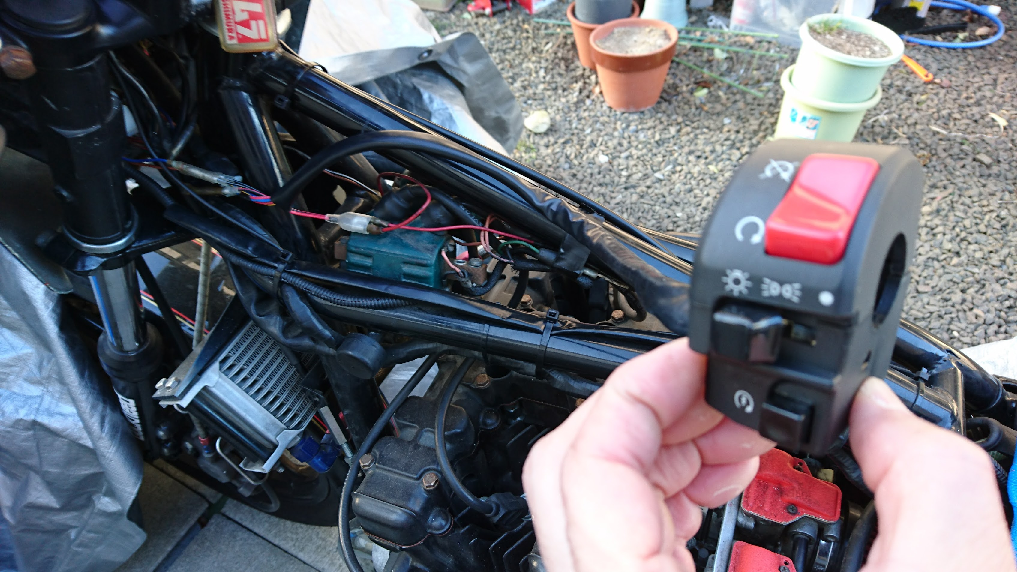
次に灯火類を。
Next, the lights.
スモール(ポジション球)、OK
Small (position light), OK
ライト、OK
Light, OK
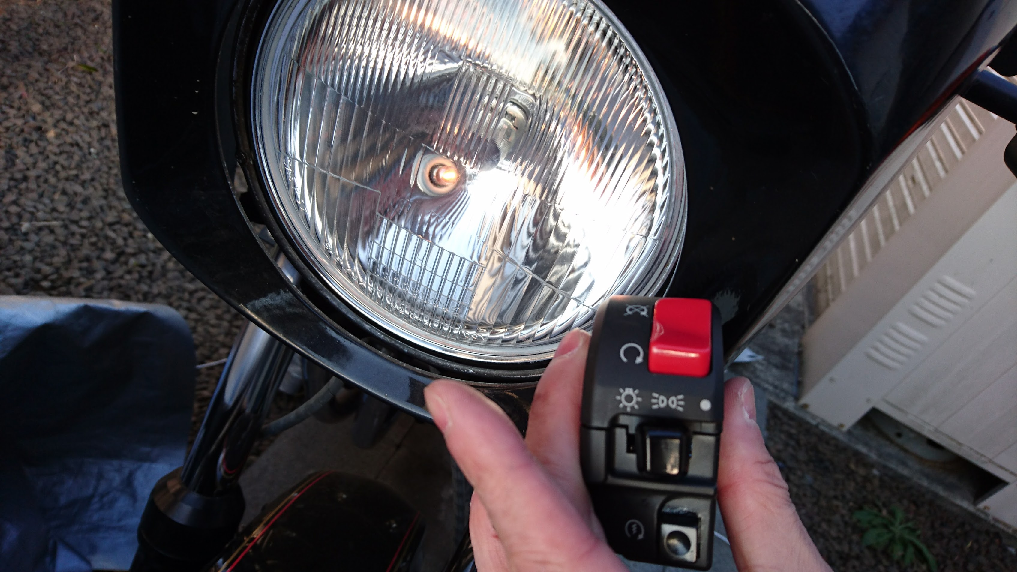
この状態で動作確認したら、取り付け開始。
After confirming the operation in this state, start the installation.
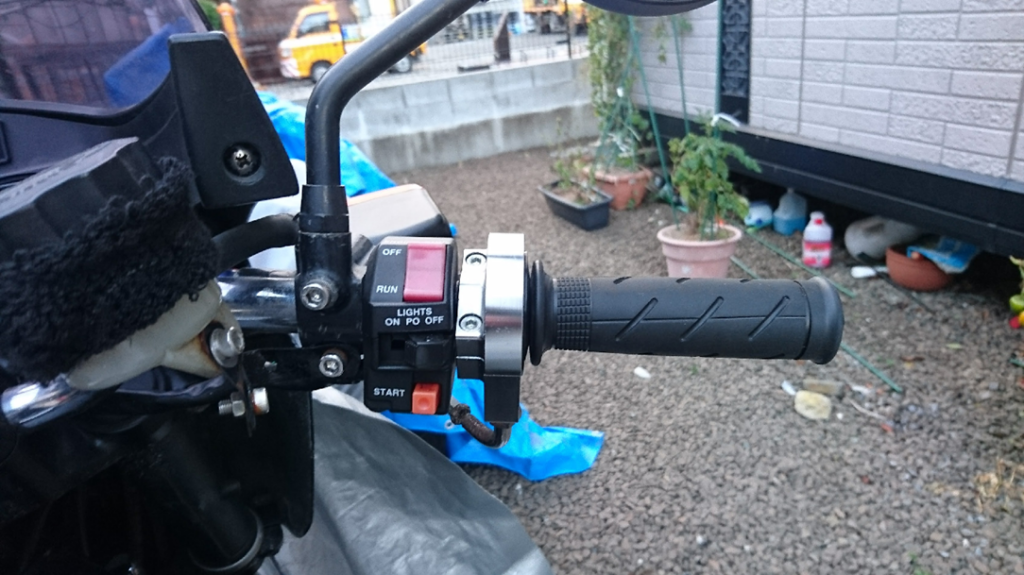
スロットル、スイッチもハンドルに付ける都合上、回り止めがついています。
The throttle and switch both have stoppers since they are attached to the handle.
ハンドルに穴を開けたくないなら、スイッチ側の凸を削り落とせばOK。
If you don’t want to drill a hole in the handle, you can shave off the protrusion on the switch side.
スロットルみたいに力がかかる部品は、ハンドルに穴を開けてしっかり固定した方がいいと思いますが。
For parts like the throttle that require force, it’s better to drill a hole in the handle and secure them firmly.
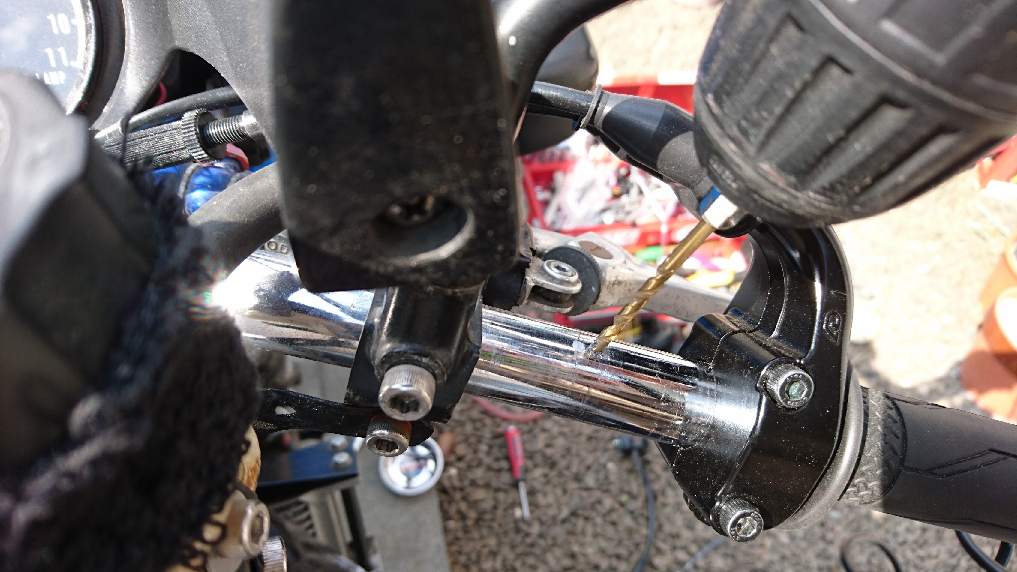
「ここぞ」という位置に穴を開けるのは、意外に難しいです。
Drilling a hole in the exact right position is surprisingly difficult.
まして穴開け作業は稀ですから、なかなか上達しません。
Since hole drilling is rare, it’s hard to get good at it.
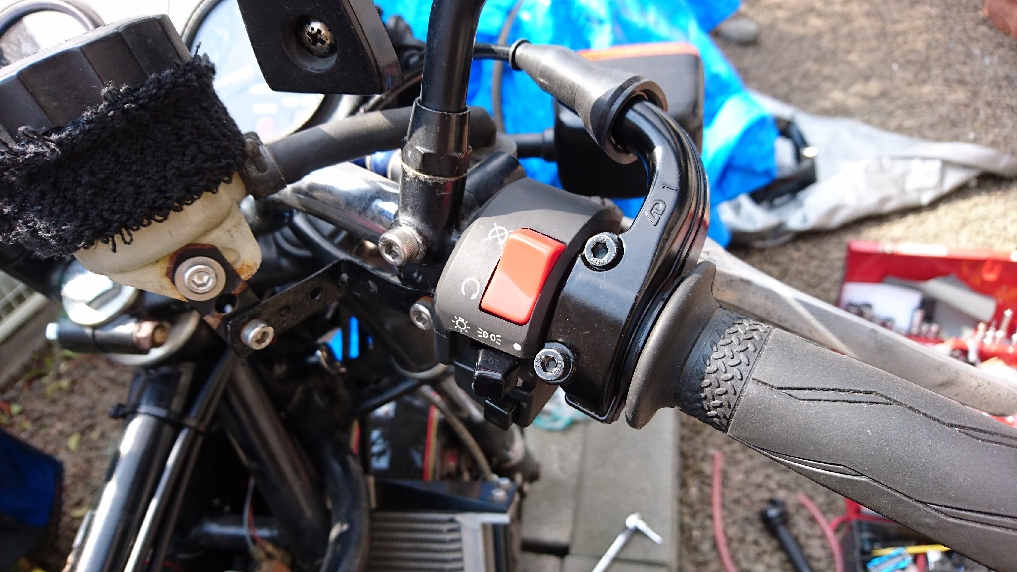
組み込み終了。
Assembly complete.
この辺の配線処理、相変わらずセンスがありません。
I still don’t have a knack for handling wiring around here.
跨ったポジションからだと、こんな感じ。
From the riding position, it looks like this.
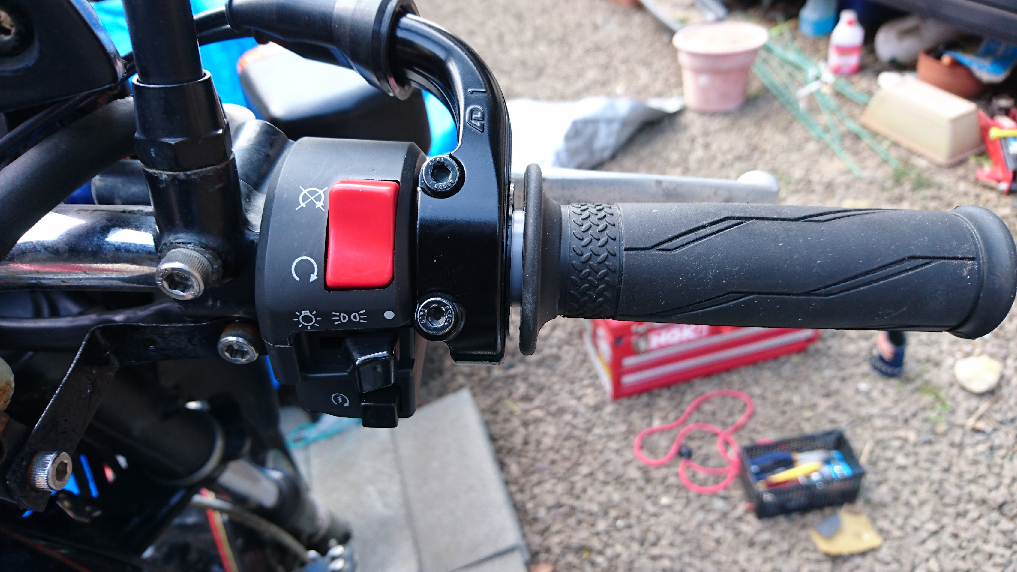
グリップが若干ずれてスロットルの樹脂(白)が見えてるのはご愛敬。
The grip is slightly misaligned, showing the throttle plastic (white), but that’s just a charm point.
どういう角度で着けるのが正しいのか分かりませんが、ライディング・ポジションでキルスイッチをいち早く操作できるのがベストでしょう。
I don’t know the correct angle for attachment, but being able to quickly operate the kill switch from the riding position is best.
そういえば、これを編集しているのは2017年3月11日なのですが、東日本大震災から6年も経ったんですね。
By the way, as I edit this on March 11, 2017, it’s been six years since the Great East Japan Earthquake.
ワタクシが住んでいるところは、割と被害が少なかったのですが、宮城県北部の沿岸はまだまだ高台移転も進んでいません。
Where I live, the damage was relatively minor, but in the northern coastal areas of Miyagi Prefecture, relocation to higher ground hasn’t progressed much.
住んでいる方々にとっては、少しずつ前進しているんでしょうけど…日中、何台ものダンプが土煙をあげて走り回ってますからね。
For those living there, it’s probably progressing little by little… during the day, many dump trucks kick up dust as they drive around.
山林を切り開いて作った新しい住宅街には、まだ人が集まっていませんし、いまだに被災したままの家に住んでいる人もいます。
The new residential areas created by clearing forests still don’t have many residents, and some people are still living in houses damaged by the disaster.
街で生活していると「案外、もう大丈夫でしょ」と思う風潮もあるんですが、震災前の状態に戻るのは、まだまだ先のようです。
Living in the city, there’s a tendency to think “it’s probably okay by now,” but it seems that returning to the pre-disaster state is still far off.
コメント