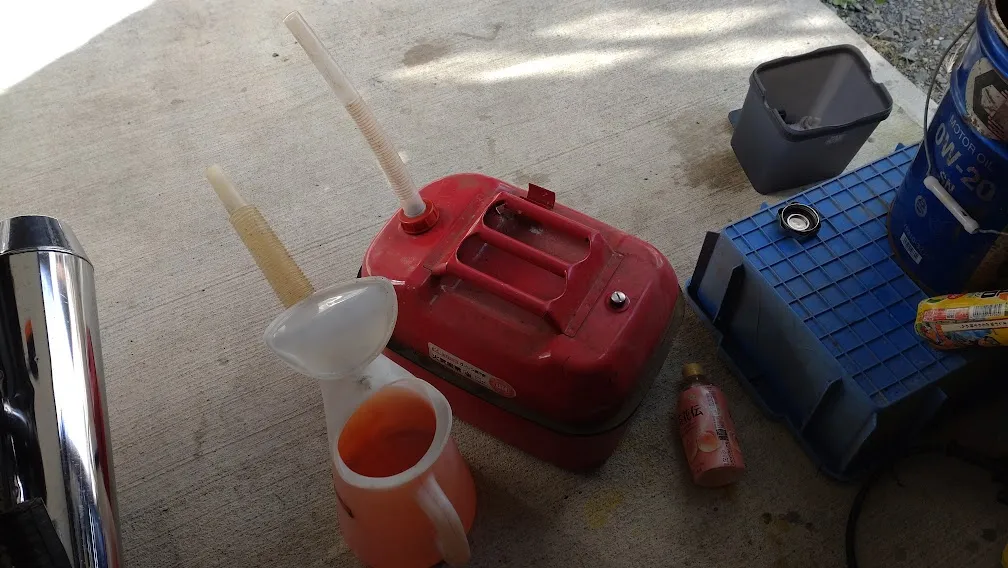
先日、燃料計をデジタル化した我が家のZ1R。
Recently, I digitized the fuel gauge on my Z1R.
デジタル表示になって見やすいことは見やすいんだけど、センサーがいい加減というか精度が落ちているせいか表示が乱高下。
The digital display is easy to read, but the sensor is inaccurate or degraded, causing erratic readings.
「結局オドメーター頼みかい!」というのも残念なのでセンサーをどうにか直そうと…
It’s disappointing to rely on the odometer, so I decided to fix the sensor.
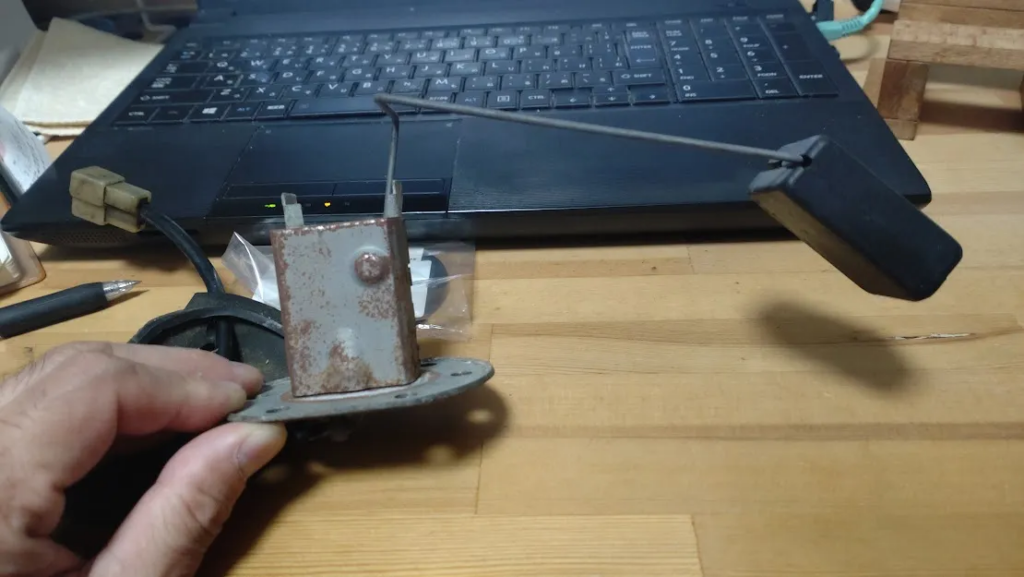
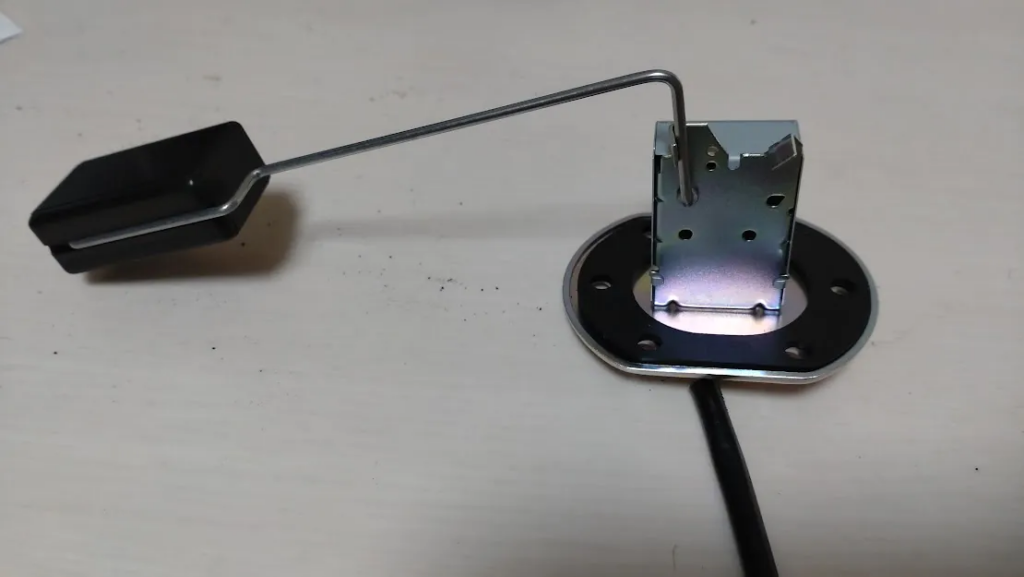
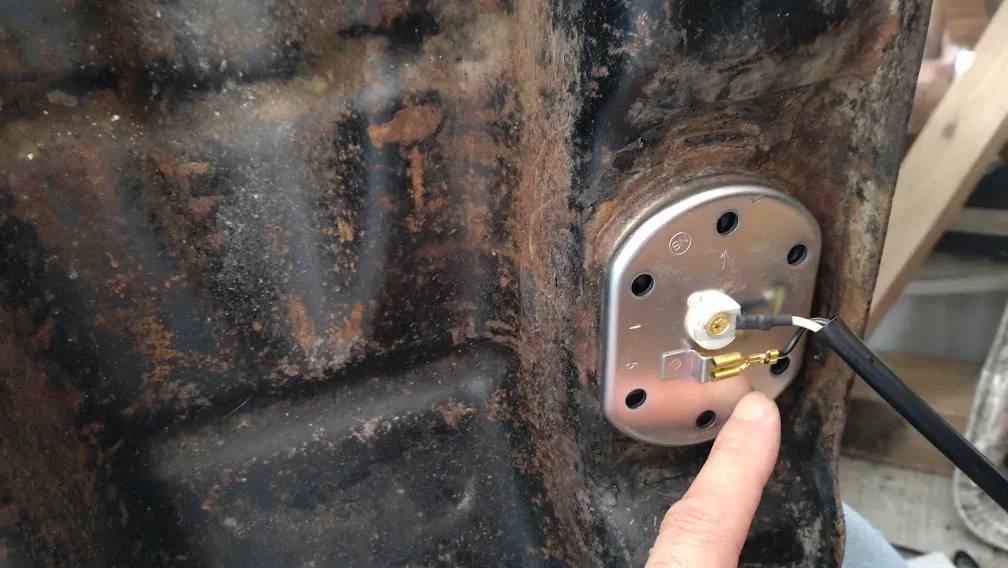
これがガソリンタンク内部に搭載されているセンサー。
This is the sensor installed inside the gas tank.
サービスマニュアルの名前は「フューエル・ゲージ・センダー」。
In the service manual, it’s called the “fuel gauge sender.”
ガソリンがどれくらい入っているかという情報を送る(send)ので、センダー、というわけ。
It sends information about how much gas is in the tank, hence the name sender.
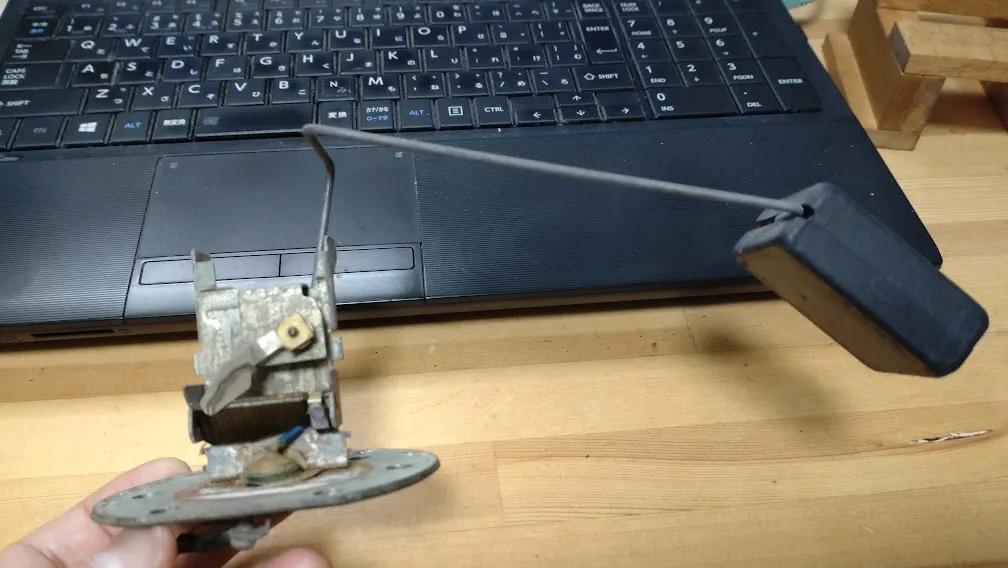
カバーを取ると、このように抵抗が現れる
Removing the cover reveals the resistor.
前回も説明した通り、スライド式の可変抵抗が内装されていて、フロートが上下すると抵抗値が変わる、というものである。
As I explained last time, it contains a sliding variable resistor that changes resistance as the float moves up and down.
ここが機能しないと、正確な抵抗値をメーターに送れない。
If this doesn’t work, it can’t send accurate resistance values to the meter.
現行車両なら迷わず52005-1011を発注するんだけど、当然ながら廃盤。
For current vehicles, I’d order 52005-1011 without hesitation, but it’s discontinued.
あとは空冷Zの駆け込み寺、ドレミコレクションから販売されているリプロ品もある。
Alternatively, there are reproduction parts from Doremi Collection, a go-to for air-cooled Z parts.

ドレミコレクションのフューエルゲージセンサー お値段は10527円
Doremi Collection’s fuel gauge sensor costs 10,527 yen.→14,124 yen (July 2024)
配線を組み替えると直るのかどうか分からないけど、ここを作り変えるのは大変。
I don’t know if rewiring will fix it, but it’s a lot of work to modify this part.
前回、表面に出ている配線をアップデートした時もかなり苦労したし。
I struggled a lot last time when I updated the exposed wiring.
近所に住んでいたけど、もう亡くなったZ1RライダーのSさんが「ここが壊れたらEX-4のパーツが使えるんだぞ」と言っていたような気もするけど、もう20年以上も前の話なので正確かどうか分からない。
A Z1R rider named S, who lived nearby but has since passed away, mentioned that parts from the EX-4 could be used here if this part breaks, but that was over 20 years ago, so I’m not sure if it’s accurate.
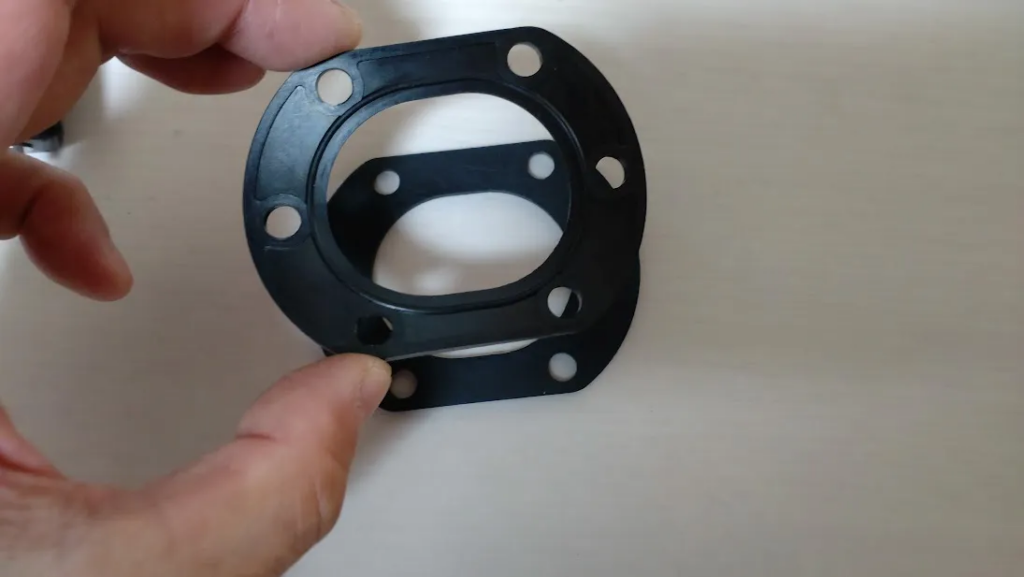
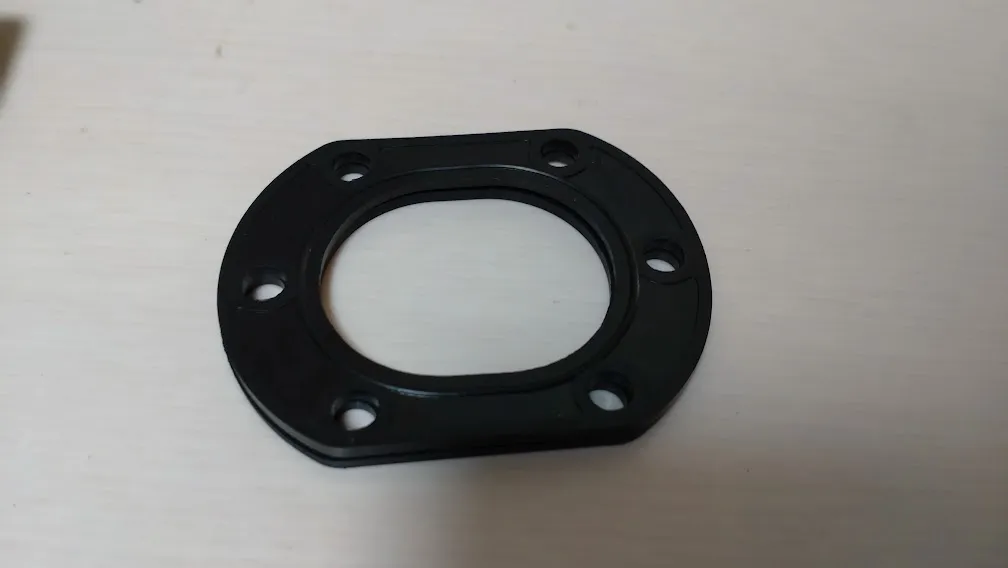
ヒントになったのが、このパーツ。
This part gave me a hint.
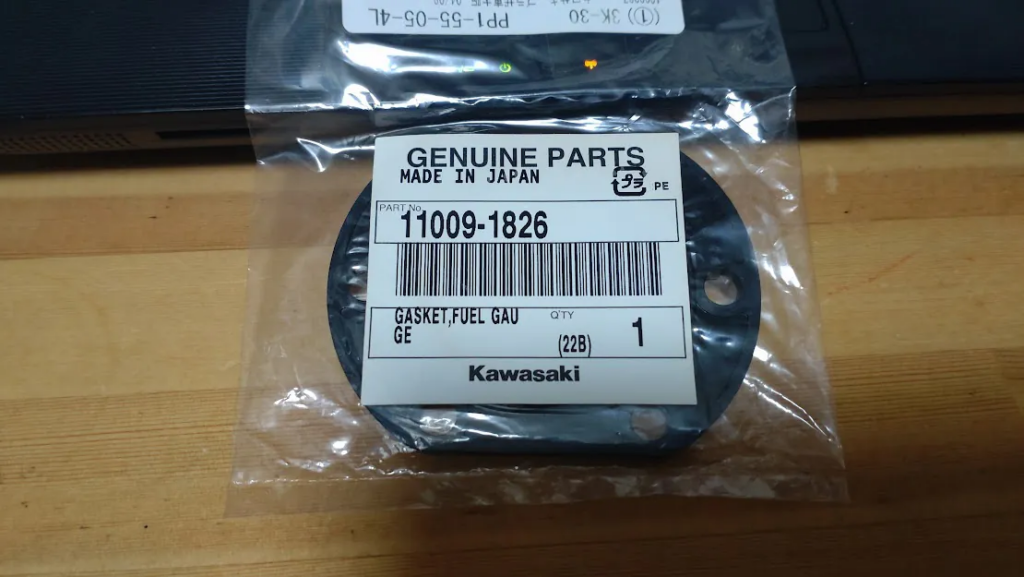
フューエル・ゲージ・センダーとガソリンタンクの間に挟まるガスケット。
It’s a gasket that fits between the fuel gauge sender and the gas tank.
随分前に購入したものだが、旧来のパーツ番号から変更になっている。
I bought it a long time ago, but its part number has changed.
そして、この番号で共通になっている車種があった。
And there are models with the same part number.
つまり、フューエル・ゲージ・センダーの取り付けピッチが共通の車種があるのだ。
In other words, there are models with the same mounting pitch for the fuel gauge sender.
手っ取り早いのは空冷Zだが、Z1~Mk2までのいわゆる第一世代のZで燃料計を積んでいるのはZ1Rだけ。
The quickest option is the air-cooled Z, but the only first-generation Z models with a fuel gauge are the Z1R.
あとはZ1100GP、Z750GP、Z1000R、Z1100R、Gpz1100などのJ系エンジンのマシン。
Other options include J-engine models like the Z1100GP, Z750GP, Z1000R, Z1100R, and Gpz1100.
マニアな方々ならご存知の通り、こういう場合はP(ポリス)から探ると、共通部品でも安く手に入ることがあるのだが、残念ながらポリスのパーツは廃盤。
Enthusiasts know that in such cases, police parts can sometimes be cheaper for common parts, but unfortunately, police parts are also discontinued.
いろいろと情報をかき集めた結果、候補は2つ。
After gathering various information, there are two candidates.
Z550用の 52005-1025 \7,062
The Z550 part 52005-1025 costs 7,062 yen.
Z1100GP用の52005-1026 \7,414
The Z1100GP part 52005-1026 costs 7,414 yen.
どちらも似ているのだが、Z550用のパーツはフロートにつくアームが長い。
Both are similar, but the Z550 part has a long arm attached to the float.
長いということは、フロートが上下する角度が小さい。
A longer arm means the float’s movement angle is smaller.
おそらくタンクの背が低い分、アームを長くしないとダメなんだろう。
Probably because the tank is shorter, the arm needs to be longer.
ブログで検証している方がいて、長さを見たら本当に長い。
A blogger tested it and confirmed the length is indeed long.
じゃあZ1100GPやローレプ用のはどうなのか…こうなったらエイヤ!で買うしかない。
So, how about the Z1100GP or GPz1100? I guess I’ll just have to buy it and see.
失敗したら、また純正部品の墓場へ…(笑)。
If I fail, it’ll go to the graveyard of OEM parts… (lol).
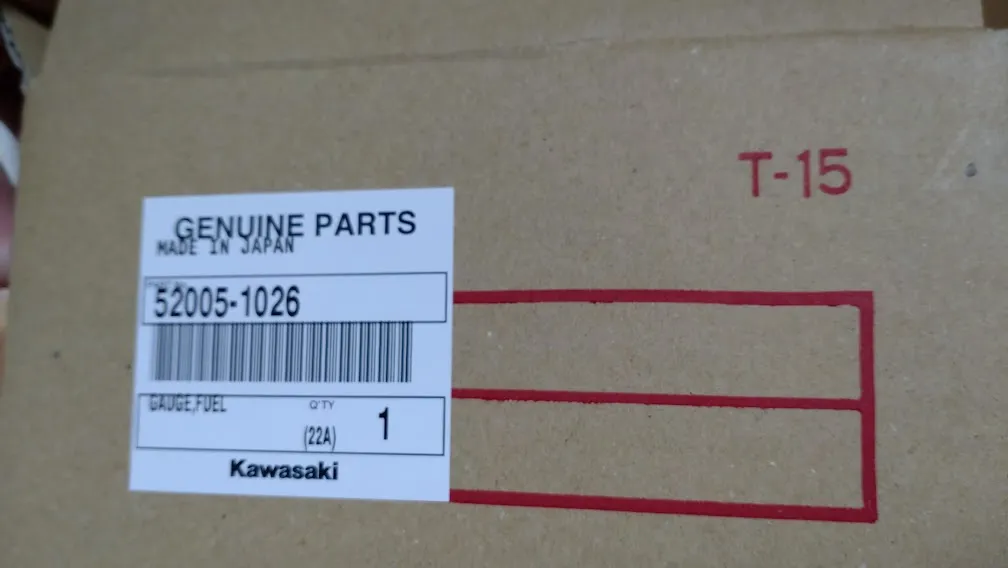
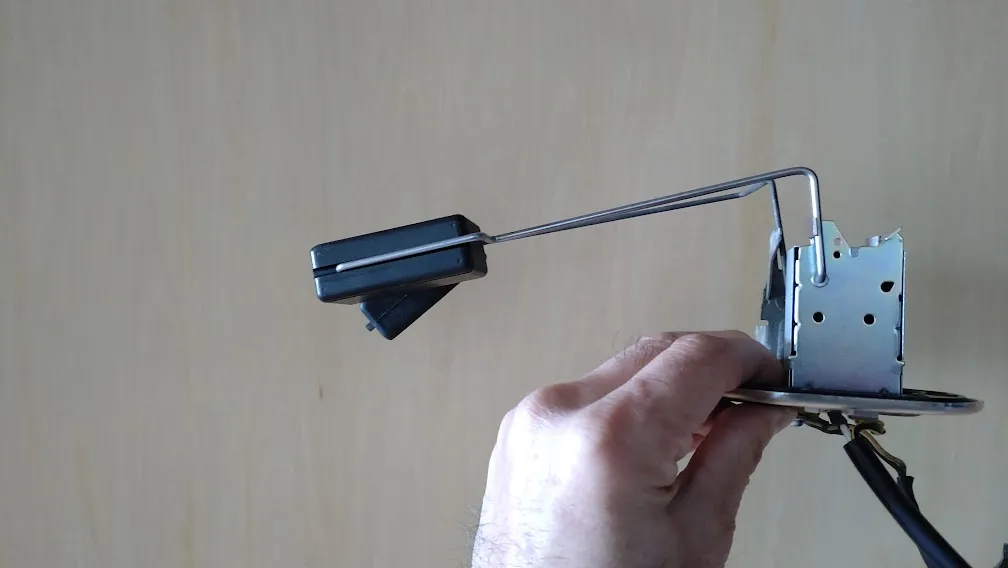
というわけで、やってきた52005-1026。
So, here comes the 52005-1026.
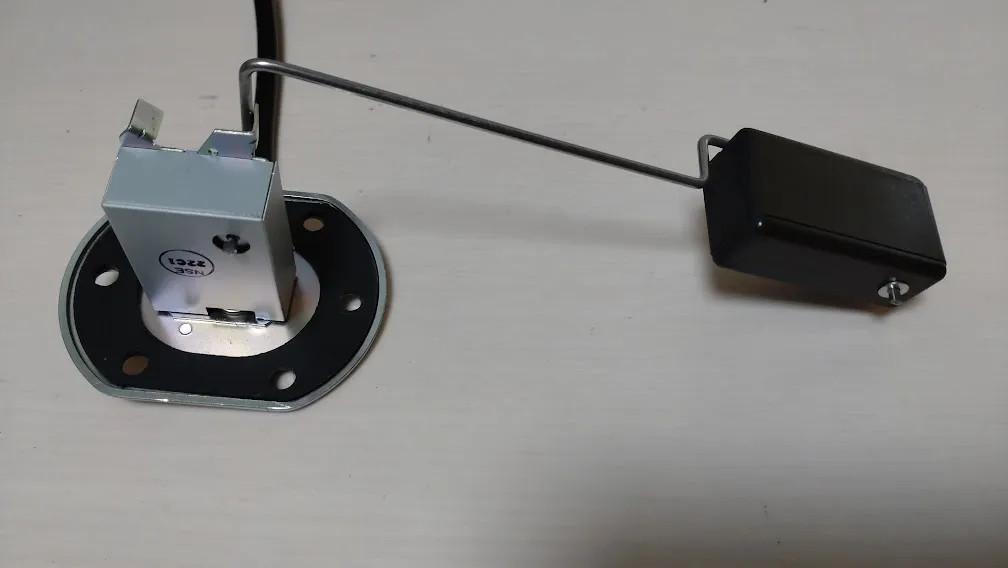
到着して気づいたんだけど、さっき紹介したリプロ品そのもの…じゃないんですかね(笑)。
I realized upon arrival that it looks exactly like the reproduction part I introduced earlier… (lol).
写真撮るの忘れたけど、センサーのカバーも付属します。
I forgot to take a photo, but it comes with a sensor cover too.
Z1Rの純正品はゴムだけど、Z1100GPの場合はプラスチック製。
The original Z1R part is rubber, but the Z1100GP part is plastic.
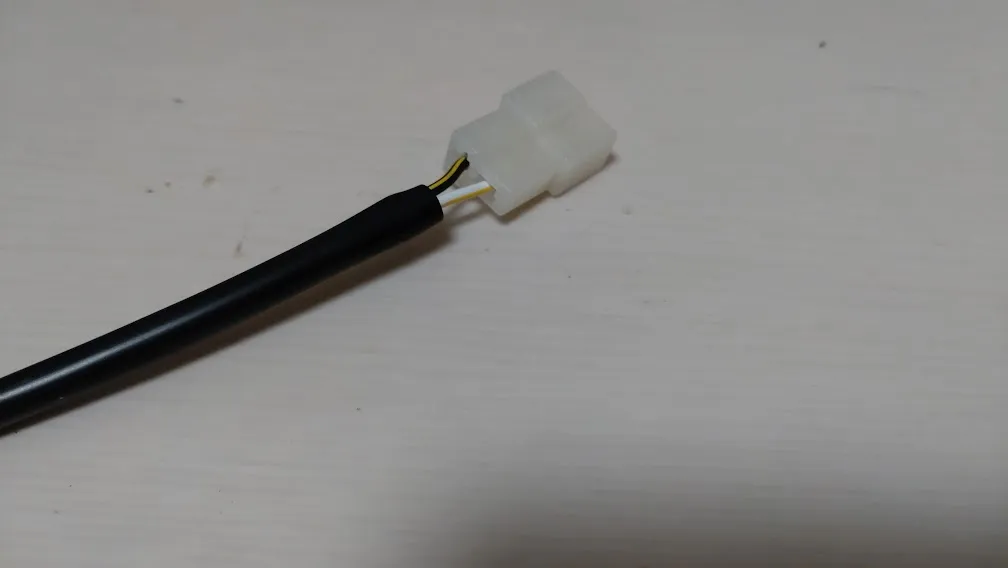
メインハーネスに繋がる2Pカプラも同じ、配線の位置も同じだからポン付け可能。
The 2P connector to the main harness and the wiring positions are the same, so it’s a direct fit.
肝心の取り付けピッチは…
The crucial mounting pitch is…
取り付けピッチは見事に一致!
The mounting pitch matches perfectly!
横から見ても、ほとんど変わらない。
It looks almost identical from the side.
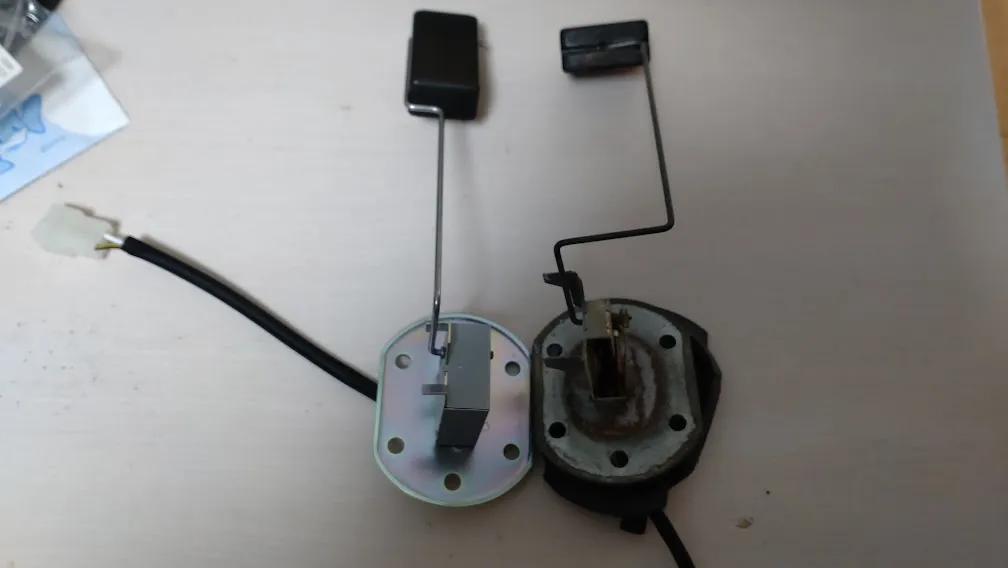
ただ、上から見るとZ1Rの純正品はアームがL字に曲がっている。
However, from the top, the original Z1R part has an L-shaped arm.
わざわざ大きく曲がっているのは、タンク内の凹凸を迂回しているせいだろうか…
Maybe it’s bent to navigate the tank’s bumps…
ちょっと嫌な予感がします(笑)。
I have a bad feeling about this (lol).
次に抵抗値を計測。
Next, measuring the resistance value.
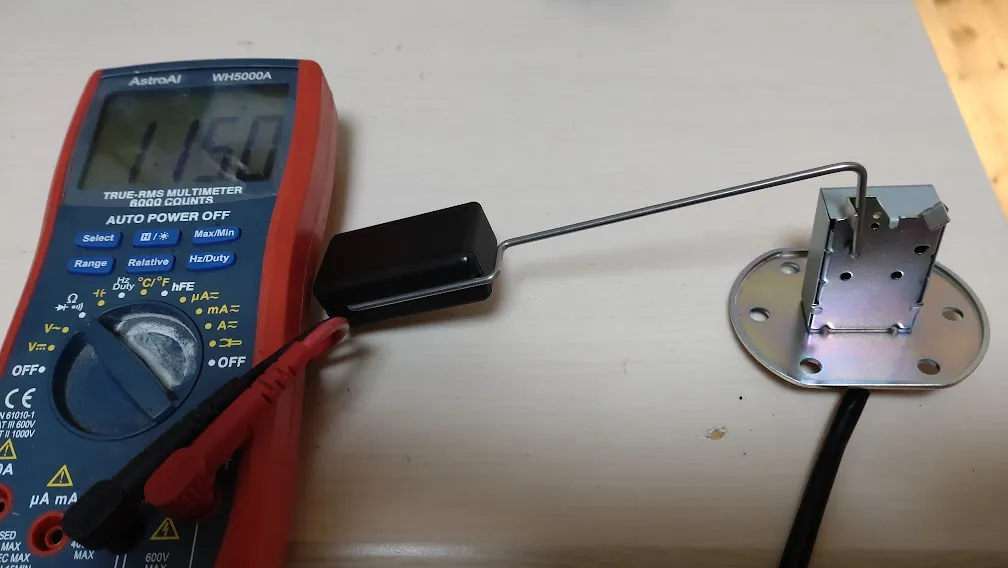
フルボトム、すなわち燃料が空になった状態だと115Ω。
At full bottom, i.e., when the fuel is empty, it’s 115Ω.
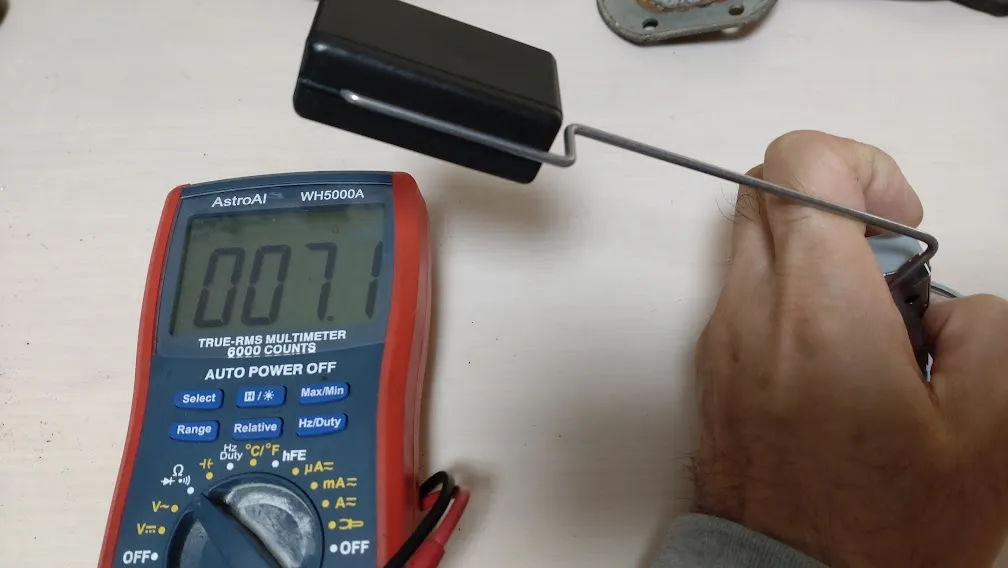
満タンでフロートが目いっぱい上がった状態だと7.1Ω。
When the float is fully up, i.e., when full, it’s 7.1Ω.
じゃあ、115Ωと7Ωね、と判断するのは早計。
So, it’s premature to conclude it’s 115Ω and 7Ω.
タンクの中でフロートがフルスイングできるかどうかは、取り付けてみないと分からない。
Whether the float can fully swing inside the tank can only be determined after installation.
ハイ、取り付けピッチはOKです。
Yes, the mounting pitch is OK.
ボルトもZ1Rのモノで長さも足りる=土台の厚みもほぼ同じ。
The bolts from the Z1R are long enough, meaning the base thickness is also almost the same.
ひっくり返して、満タンになっている状態を作り出した場合、フロートが何Ωを差すか…
When turned upside down to simulate a full tank, the float measures…
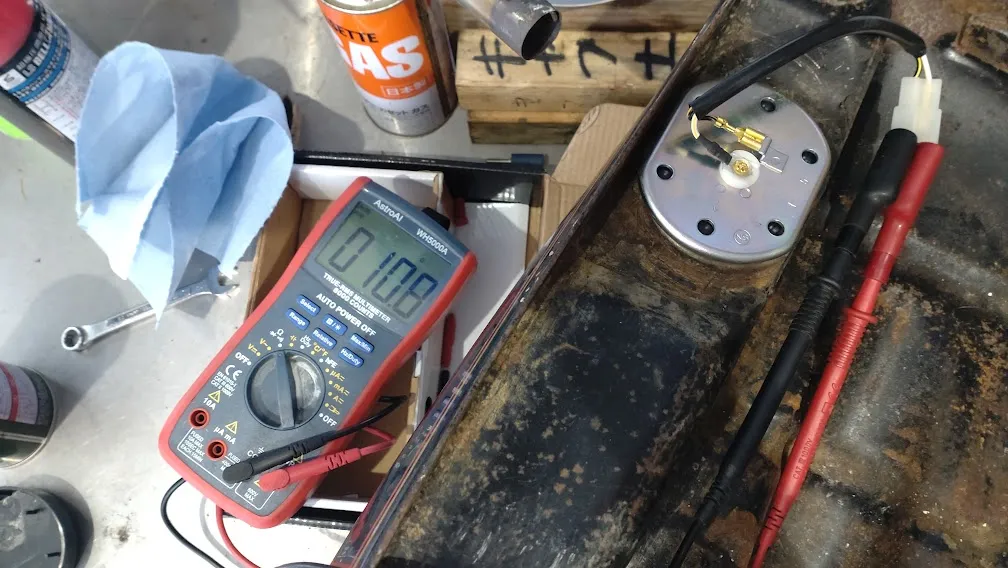
10.8Ω。
10.8Ω.
ということは、このままだとガソリンタンクの天井に当たるんだろうか?
So, will it hit the gas tank ceiling as is?
ガソリンを入れて計測すると、満タンで20Ω近くになった。
When filled with gas and measured, it was nearly 20Ω when full.
やっぱり、この微妙な角度の違いのせいだろうか?
Is it due to this slight angle difference?
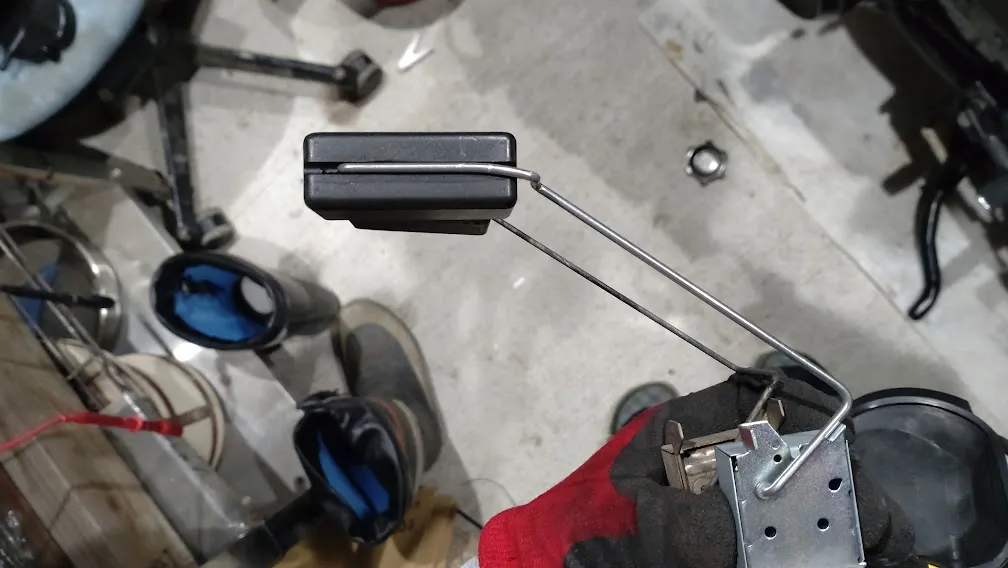
それでは万力とペンチでアームを少し曲げてみる。
Then, I’ll bend the arm slightly with a vise and pliers.
若干の違いはまだあるけど、これくらいなら誤差の範囲でしょう。
There are still slight differences, but this should be within the margin of error.
もう一度、搭載して計測してみる。
Let’s install it again and measure it.
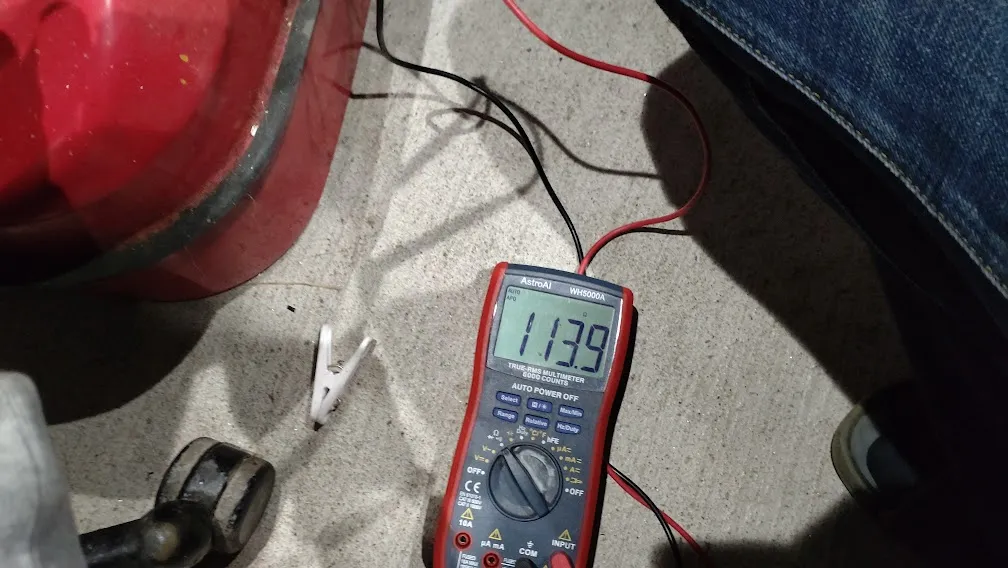
ガソリンが空の状態で113.9Ωだから、そんなに変わらない。
It’s 113.9Ω when empty, so not much change.
次に満タンだと…
Next, when full…
満タンになると15Ω。
When full, it’s 15Ω.
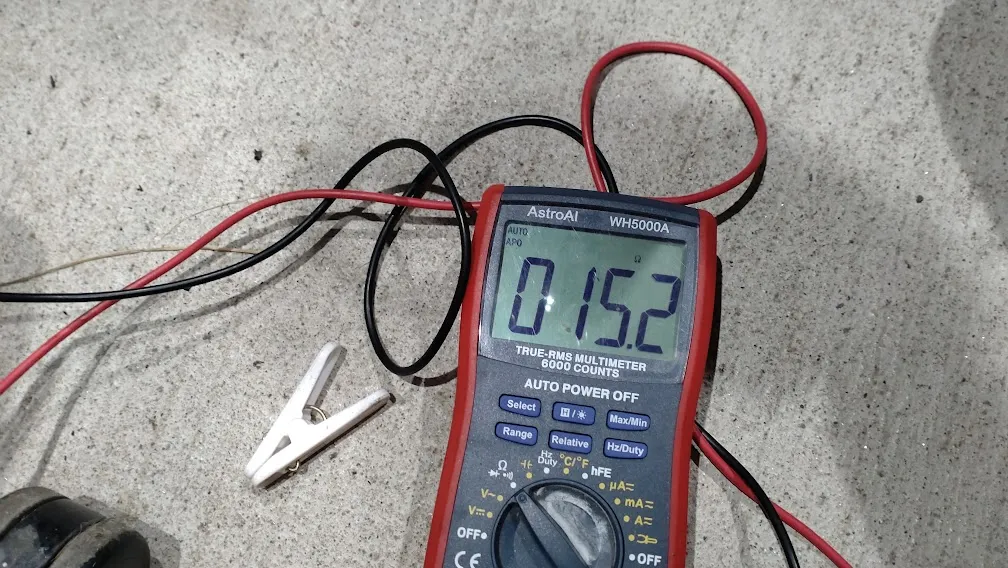
さっきよりも若干抵抗値が減った。
The resistance value has slightly decreased from before.
フロートの角度が変わって、アームがより上に来るようになったので当然といえば当然なんだけど、加工したことが結果としてちゃんと現れたのが良いね。
The float angle has changed, bringing the arm higher, which is expected, but it’s good to see the modification results properly reflected.
これで、何も変わらなかったら困る。
It would be problematic if nothing changed.
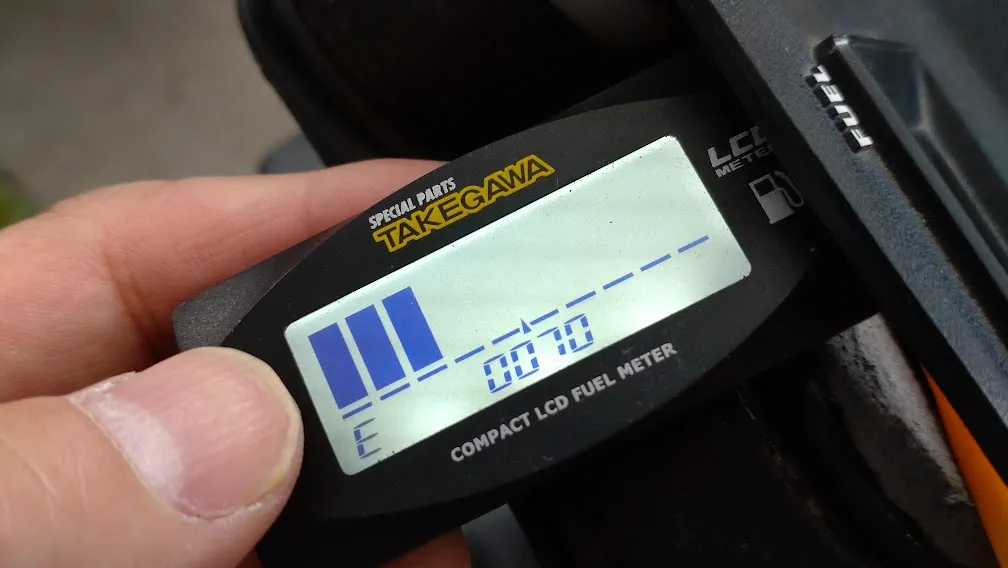
で、もう一度カウルを外し、メーターを設定し直して完成。
So, I removed the cowl again, reset the meter, and finished.
作りながら思ったんだけど、これがタンクの小さい1型のZ1Rだったらどうなんだろう。
While working, I wondered what would happen if it were the smaller tank of the first-generation Z1R.
純正部品も番号が違うんだろうか。
Would the original part number also be different?
気になって調べてみたら、1型は52005-1002なのでセンサーは別物。
I checked and found that the first-generation uses 52005-1002, so the sensor is different.
もしかしたら、Z1R1型(Z1000D1)の場合、52005-1025を加工するとよいのかも。
Maybe for the first-generation Z1R (Z1000D1), modifying 52005-1025 would be good.
Z1Rは明らかにD1オーナーの方が多いので、そこら辺は要注意ですな。
Since there are clearly more D1 owners for the Z1R, this is something to watch out for.
それから付属するカバー、これがプラスチック製で深さもあるので「取り付けたら、キャブの屋根とかシリンダーヘッドに当たらない?」と心配になるんですけど…
Regarding the included cover, it’s plastic and quite deep, so you might worry if it’ll hit the carburetor roof or cylinder head when installed…

写真がピンボケで申し訳ないですけど、余裕あります。
Sorry for the blurry photo, but there’s plenty of clearance.
Z1Rの純正品はゴムが硬化してしまって、ハメるのがすごく大変だったりする。
The original Z1R rubber part hardens over time, making it very difficult to fit.
そのうえ、配線とセンサーの間に入っているので、このカバーだけを外して作業することが出来ない。
Moreover, it’s between the wiring and the sensor, so you can’t remove just the cover to work on it.
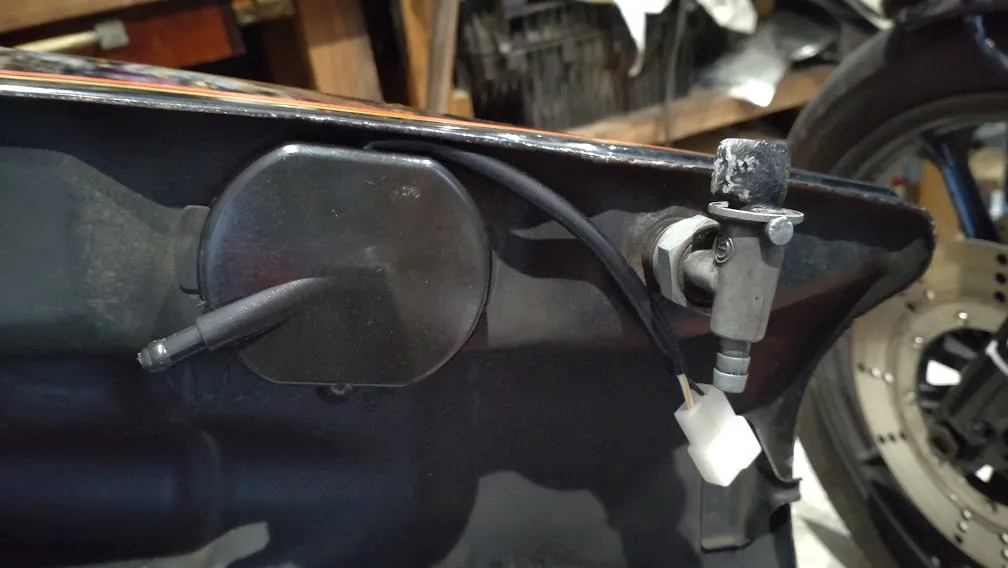
Z1100GP用のパーツはカバーが後付けで装着できるのでとても便利です。
The Z1100GP part has a cover that can be attached later, making it very convenient.
□ 追記 □
Additional Note
実は設置した後が大変というか、思い通りにいかなかった。
Actually, after installation, things didn’t go as planned.
おおむね燃料が半分まで減っても、ゲージは90%くらいを差したまま。
The gauge still read around 90% even when the fuel was about halfway.
おかしいな、と思ってガソリンタンクを空っぽにすると、これはちゃんとエンプティになる。
I thought it was strange, but when I emptied the gas tank, it did correctly show empty.
ところが、満タンとか半分とか4分の1とか4分の3とか、半端な位置を測定してくれない。
However, it doesn’t measure intermediate levels like full, half, a quarter, or three-quarters accurately.
デジタル燃料計は、おそらく満タン時の抵抗値、空っぽの時の抵抗値の差を等分にして「この抵抗値なら半分」と予想して表示しているのだと思う。
The digital fuel gauge likely divides the difference between the full and empty resistance values equally to estimate and display “half full” at a certain resistance value.
多分ね。
Probably.
一方、センダーの抵抗値。
On the other hand, the sender’s resistance value.
たとえば満タンで10Ω、エンプティで110Ω。
For example, 10Ω when full and 110Ω when empty.
フロートの動きによって60Ωを差した時が真ん中だと思うでしょう、心情的には。
Emotionally, you’d think 60Ω would be the middle based on the float’s movement.
ところが、そうとは限らない。
However, that’s not necessarily the case.
満タンにならなくても、フロート自体が10Ωをさせば、燃料計は「満タン」と判断してしまう。
Even if it’s not completely full, if the float reads 10Ω, the fuel gauge will think it’s full.
ここの調整が本当に難しい。
Adjusting this part is really difficult.
曲げたフロートの針金も、もう一度戻したり、メーターの設定値を微妙に変えてみたり。
I tried bending the float wire back and tweaking the meter settings slightly.
個人的にはエンプティの値を厳しめにしておいて、実際はまだガソリンが残っているけどエンプティ表示した方がいいんじゃないかと…
Personally, I think it’s better to set the empty value strictly so that it shows empty while there’s still some gas left.
なので満タンを8Ω、エンプティを110Ωくらいに設定しております。
So, I set full to 8Ω and empty to around 110Ω.
ボタンひとつなので、設定に時間がかかる
Since there’s only one button, it takes time to set up.

コメント