いやーホントに暑い夏ですな。
It really is a hot summer.
9月だから残暑ってことになるんだろうけど。
Since it’s September, I suppose it’s considered late summer.
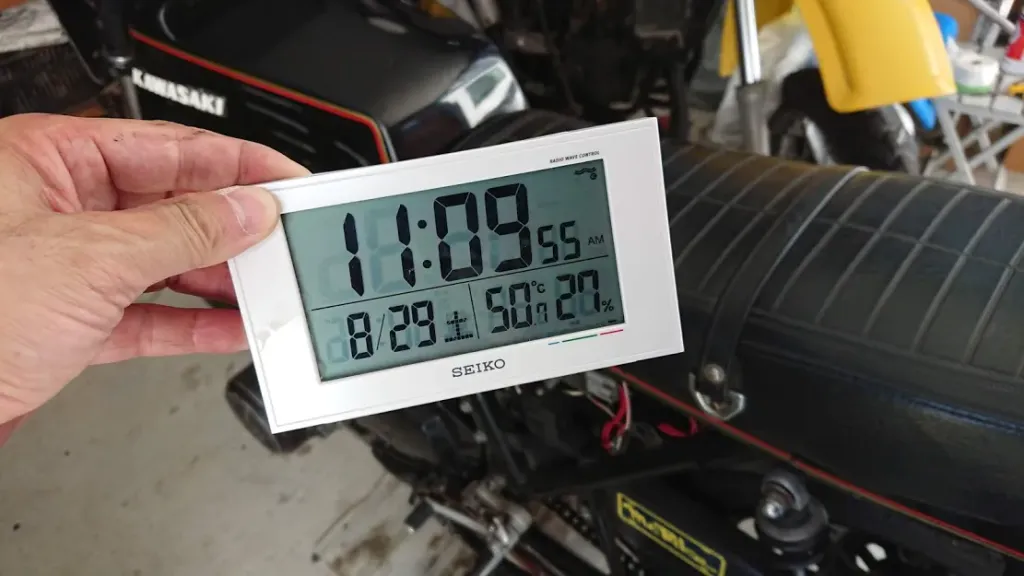
こないだ、日なたはどれくらいの気温なんだろうと温度計を出してたら…
The other day, I wondered how hot it was in the sun, so I took out a thermometer…
真っ黒い鉄板の上に置いたわけじゃないよ。
I didn’t place it on a black iron plate.
土の地面から1mくらいのところに固定して計測したら、あっという間にこんな感じに。
I fixed it about 1 meter above the ground and measured it, and it quickly looked like this.
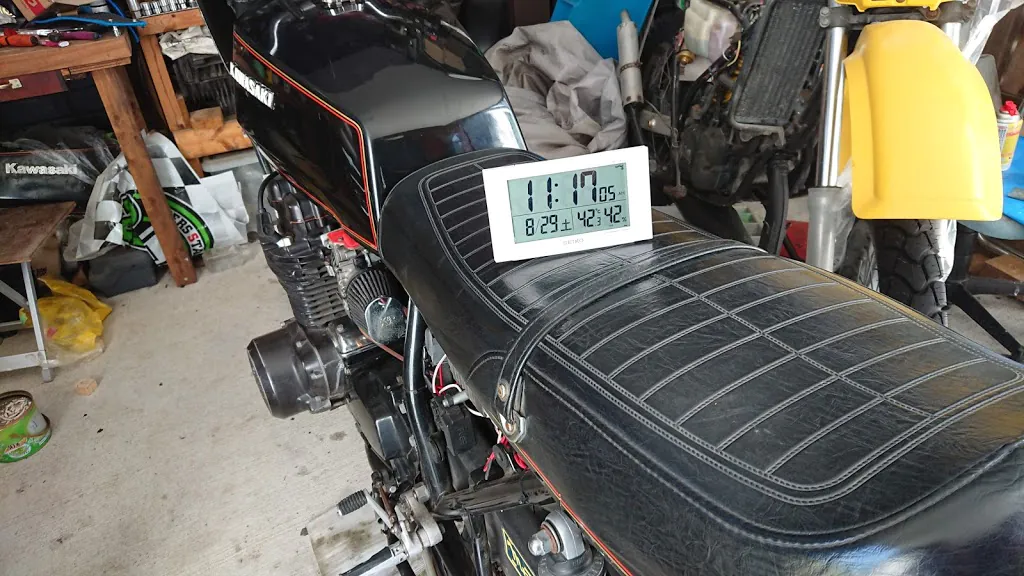
日陰でもご覧の通り。
Even in the shade, it was like this.
こないだぶっ壊したところのテストもあったんで走ってみたけど、30分でギブアップ。久しぶりに、アタマがクラクラしました。
I also had to test the part I broke the other day, so I rode, but gave up after 30 minutes. It was the first time in a while that I felt dizzy.
次の日は、いくぶん走りやすかったけど。
The next day was somewhat easier to ride.
そういや、この時、前をスーパースポーツのマシンが走ってて。
By the way, at that time, a super sports machine was running ahead.
最近のマシンは、どういう走りをするのか気になったので、ちょっと間を開けて後ろを走らせてもらった。
I was curious about how recent machines run, so I kept a little distance and followed behind.
予想はしていたけど、これが、メチャクチャ速い。
As I expected, it was incredibly fast.
多分、あっちは「パーシャル」くらいなもので、鋭角なコーナーもノーブレーキでクリアしていく。
Probably, it was just “partial throttle” for them, and they cleared sharp corners without braking.
肩に力も入っていないし、まるで、スピードスケートの選手がウォーミングアップするかのように、滑らかに走っている。
Their shoulders weren’t tense, and they were running smoothly as if a speed skater was warming up.
ところが、こっちは関西人がいうところの「必死のパッチ」。
On the other hand, I was riding with “desperate effort” as Kansai people say.
ガッツリ減速してから立ち上がり重視でいかないと、間違いなくコーナーの彼方に吹っ飛んでいく。
I had to slow down significantly and focus on acceleration, or I would definitely fly off the corner.
これ以上は無理だな、と思ったら、向こうがマシンを左側に寄せて道を譲ってくれた。
When I thought I couldn’t keep up anymore, they moved their machine to the left and let me pass.
追い回した感じになっちゃったかな…ゴメンよー、と挨拶して、いつもの休憩ポイントへ。
I felt like I was chasing them… I apologized and headed to my usual rest point.
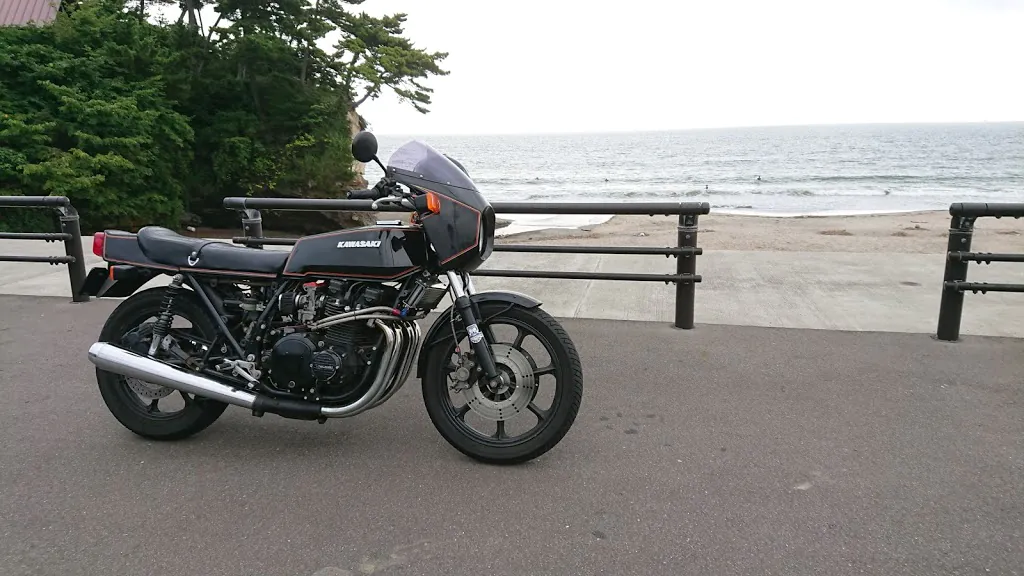
久しぶりにタイヤの端っこまで使ってみて、楽しかったな、と思ってたら…
It was fun to use the edge of my tires for the first time in a while, and I thought…
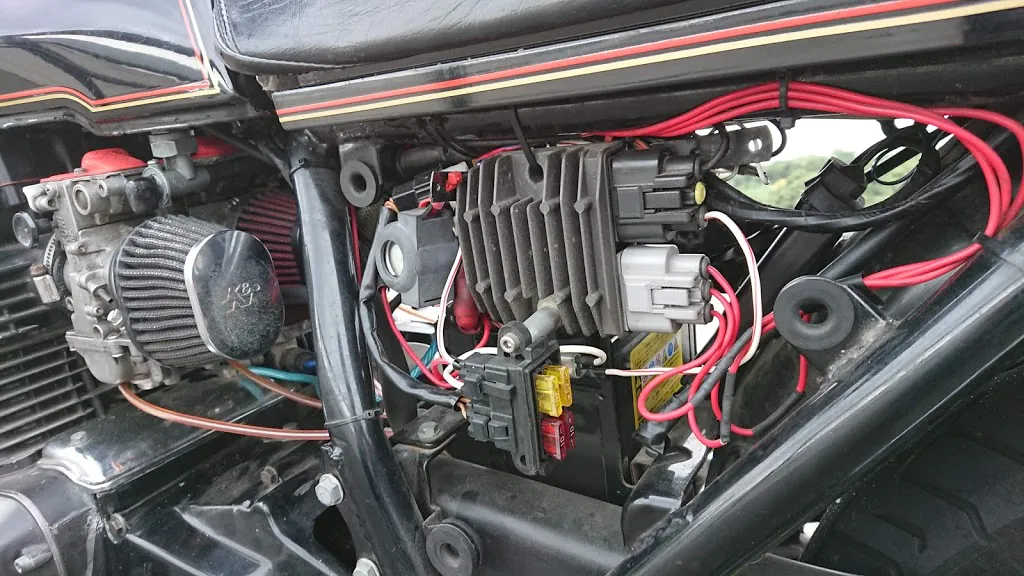
あら?ヒューズボックスのフタが無いじゃない!?
Oh? The fuse box cover is missing!
※今回の英語版では割愛しているが、この当時に装着しているフューズボックスはSUZUKI BANDITからの流用品で2000年代初期に着けたもの。
Note: Although omitted in this English version, the fuse box installed at that time was a used part from a SUZUKI BANDIT, attached in the early 2000s.
現在は廃盤。
It is now discontinued.
どこで落っことしてきたんだろか…
Where did I drop it…
さすがに、見つけることは不可能だろうから、そのまま帰宅。
It’s impossible to find it, so I went home.
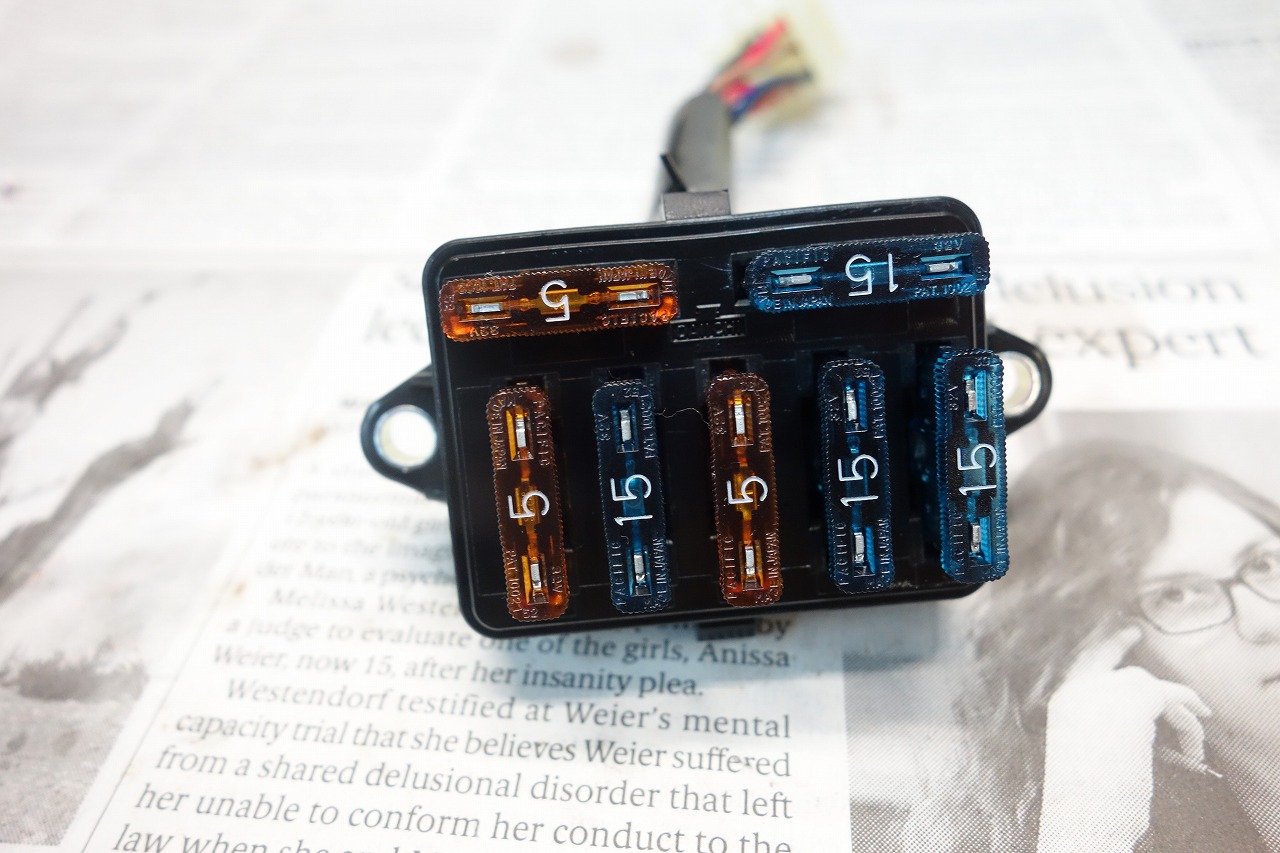
で、購入したのがコレ。
So, I bought this.
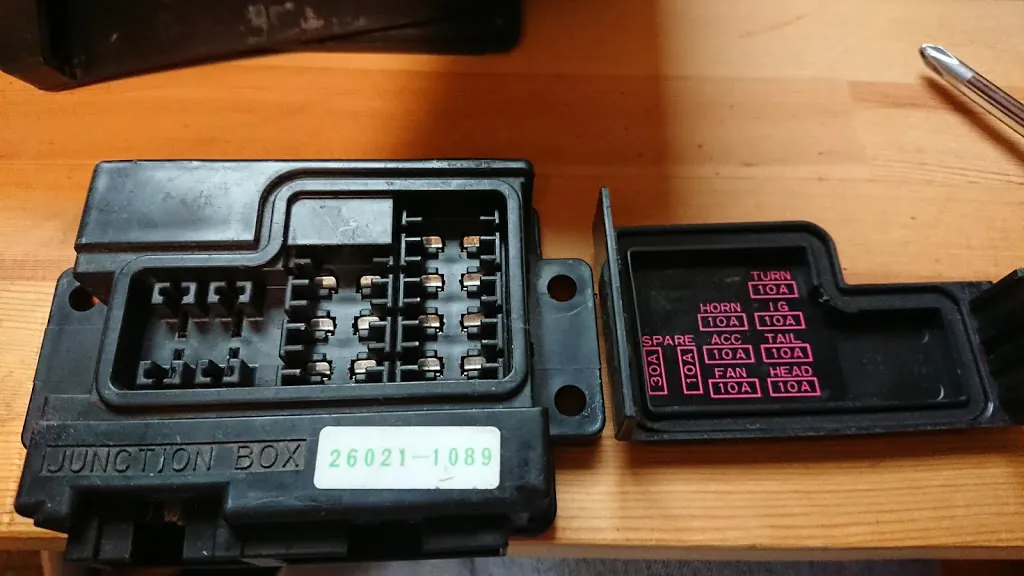
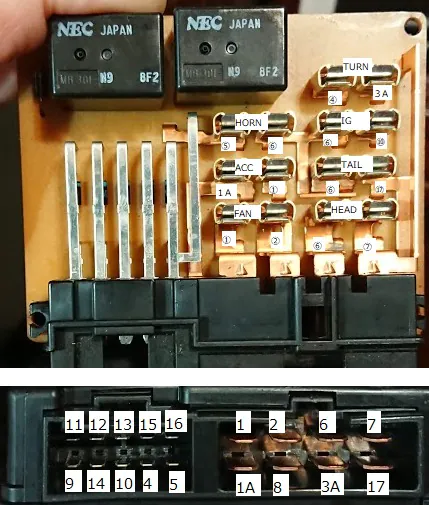
ZRX用のヒューズボックス…正確にはジャンクションボックス。
A fuse box for ZRX… more precisely, a junction box.
ヤフオクで100円でした(笑)。
It was 100 yen on Yahoo Auction (lol).
某有名店の高性能ヒューズボックスにあやかろうと…
I was trying to emulate a high-performance fuse box from a famous store…
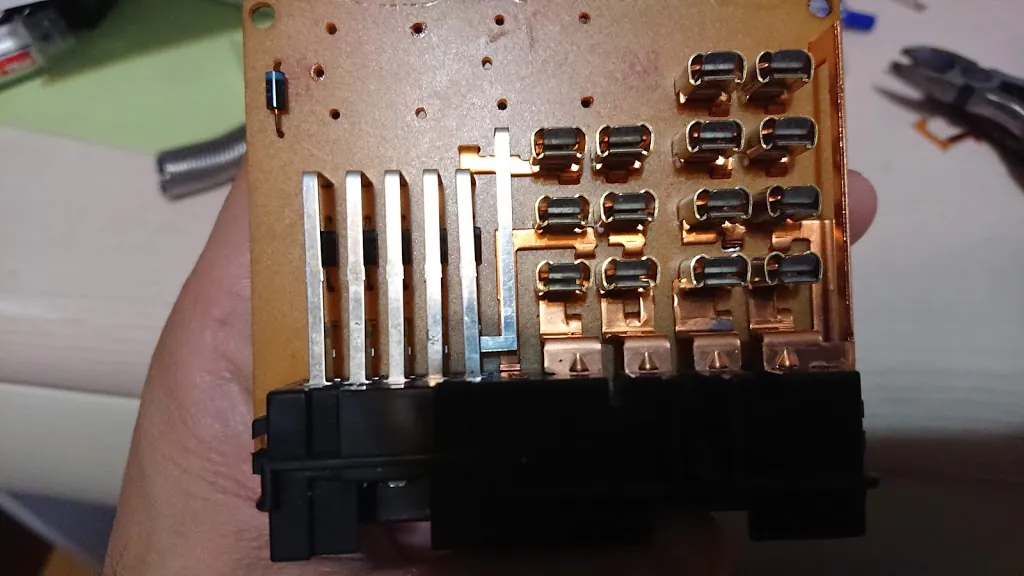
いったい、どんな仕組みなのか…購入したものは、必ずバラバラにしないと気が済まない危ない性癖の持ち主なので、早速バラしてみる。
I wonder how it works… I’m the type who has to disassemble anything I buy, so I took it apart immediately.
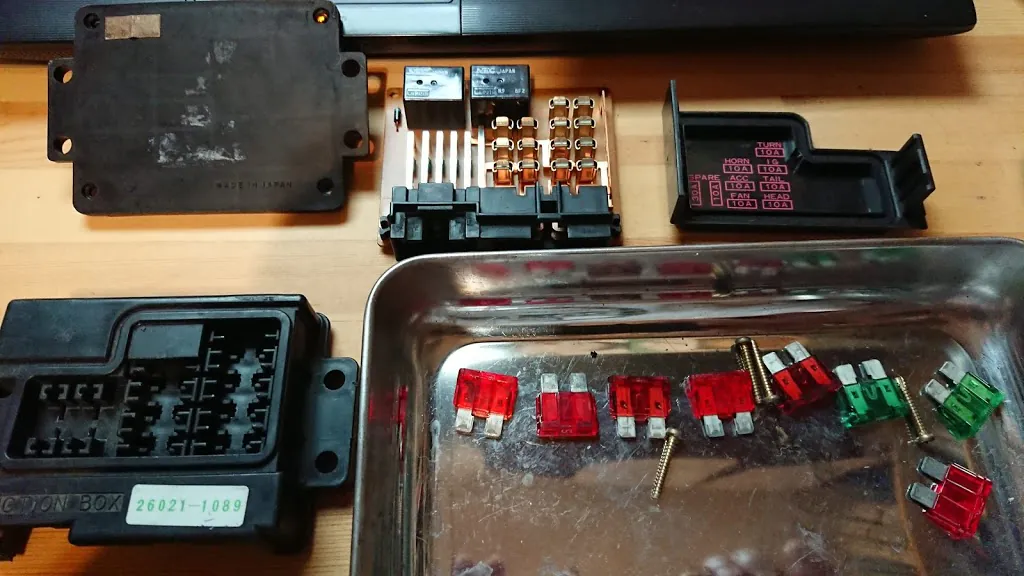
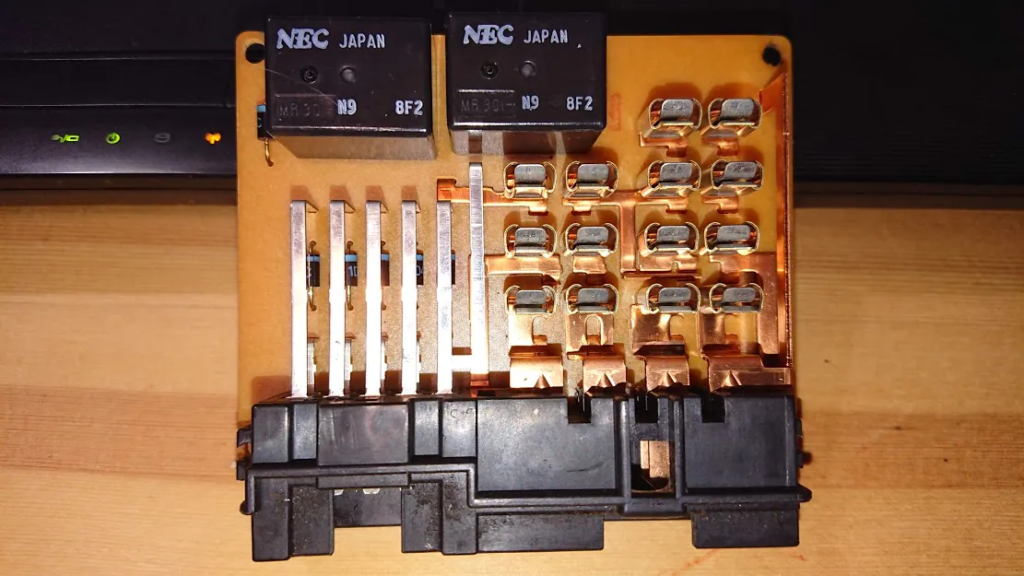
なるほど、2つもリレーが入ってるから重たいのね。
I see, it’s heavy because it has two relays.
何でまた、こんな御大層な部品なんでしょう。
Why such an elaborate part, I wonder.
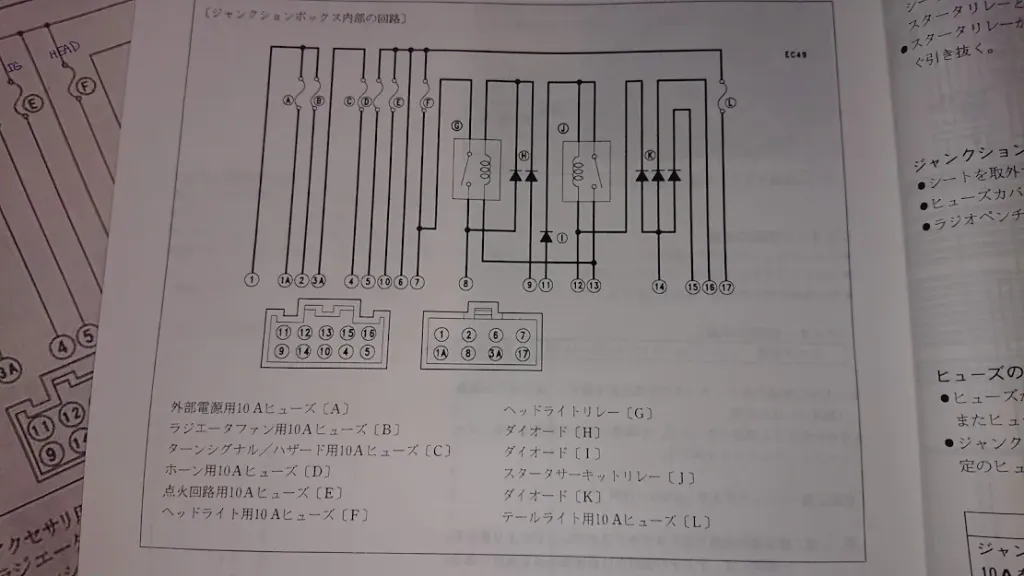
お向かいさんが水冷Z乗りってんで、サービスマニュアルを見せてもらう。
My neighbor rides a ZRX1100, so they showed me their service manual.
何だかエラいことになってますな。
It seems quite complicated.
ようするに、こういうことですか。
So, this is how it is.
某社のヒューズボックスも、リレーを活かしてIGオンでヘッドライトが消える仕組みになっているけど、我が家のマシンは豪州仕様なのでライトは自在に消せるのよね。
The fuse box from a certain company also uses a relay to turn off the headlights when IG is on, but my machine is an Australian model, so I can turn off the lights freely.
そうすると、リレーの意味がないというか、これ、持ってみると分かるんだけど、本当に重い。
So, the relay is pointless, and when you hold it, you realize it’s really heavy.
7枚ヒューズが刺さるのは嬉しいけど、こんな重たいもの、ステーにくくりつけて走る気にはなりません。
It’s nice that it can hold seven fuses, but I don’t feel like running with such a heavy thing attached to the stay.
他社にも5、6枚ささるヒューズボックスがあるんで、そっちの方がいいかも。
Other companies have fuse boxes that can hold 5 or 6 fuses, so that might be better.
ヤフオクでも2000円ちょいで、具合よさそうなのが売ってるのよ。
There are good ones sold for a little over 2000 yen on Yahoo Auction.
でも、そういうのを買ってしまったら…それまでなので(笑)。
But if I buy something like that… it’s the end of it (lol).
だいたい、解析は終わって、リレーは気にしない方向で接続したらいいや、と思うんだけど…これ、よく見たら4系統がまたがってる(端子番号6番)。
I’ve mostly finished analyzing it, and I think I can connect it without worrying about the relay… but looking closely, there are four circuits overlapping (terminal number 6).
まあ、いいといえば、いいんだろうけど…
Well, it’s fine, I guess…
そこら辺、もうちょっと確認が必要ね…
I need to check that part a bit more…
イロイロ考えてみたんだけど、欲しいのは特別なヒューズボックスではなく、これまで通り、ヒューズを刺して回路をつなぐだけの単純なモノ。
After considering various things, what I want is not a special fuse box, but a simple one where I can just insert fuses and connect circuits as before.
ジャンクションボックスのように機能が複雑になれば、何かトラブルが起きた場合、リレーやダイオードまでチェックしなければならず、便利なアイテムが逆にリスクを増大させる可能性もある。
If the functionality becomes complex like a junction box, in case of trouble, I’d have to check the relay and diodes, which could increase risks instead of convenience.
最新式のクルマのようにたくさんの電子機器によって制御され、まるでスマートフォンにタイヤがついたような乗り物…ゼットはそんな乗り物じゃない。
Like a modern car controlled by many electronic devices, it’s like a smartphone with tires… but the Z isn’t such a vehicle.
人の手が巻いたコイルが火花を散らして、重力やら気圧やらの力を利用してガソリンに火をつけ、機嫌が悪くならないように、時々アブラをさしてやる。
A coil wound by human hands sparks, using gravity and atmospheric pressure to ignite gasoline, and occasionally needs oiling to keep it in a good mood.
もちろん、最新式のシステムにアップデートしたゼットも沢山あるから、そういう人達は高性能なパーツを選んだら良いと思う。
Of course, there are many Zs updated with the latest systems, so those people should choose high-performance parts.
というわけで、今回、手に入れたヒューズボックスは、原始的なヒューズボックスとして「デチューン」することに。
So, I decided to “detune” the fuse box I got this time to make it a primitive fuse box.
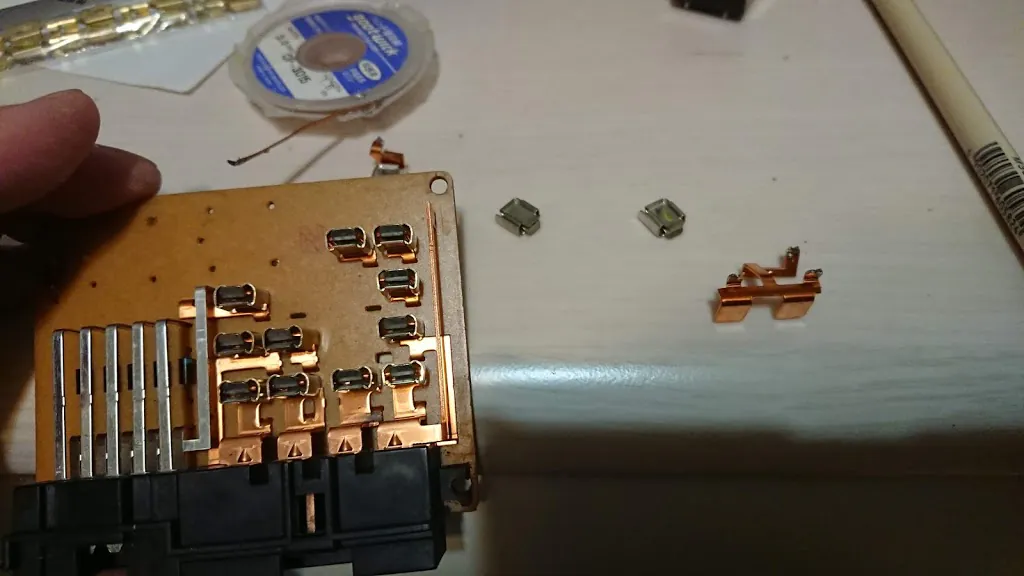
いったん「要らない」と決めたからには、不要なものは取っ払いましょう。
Once I decided I didn’t need it, I removed unnecessary parts.
まずは、リレーとダイオード。
First, the relays and diodes.
基板からパーツを抜く時は、はんだを溶かすだけじゃなくて、吸い取らないといけないので、吸取線を使います。
When removing parts from the board, you need to not only melt the solder but also suck it up, so use desoldering braid.
配線図を見た時から悩ましかったのが、6番端子の存在。
What troubled me from the moment I saw the wiring diagram was the existence of terminal number 6.
4系統が6番と重複している。
Four circuits overlap with number 6.

パっと思いついたのは茶の配線。
What came to mind quickly was the brown wiring.
スモールライトを点灯させたり、ETCの電源を取ったりする12V線。
A 12V line that powers small lights or ETC.
でも、そんなに使うだろうか…ホーン、テールランプ…あと何だ?
But would it be used that much… horn, tail lamp… what else?
あまり思いつかないし、配線レイアウトに縛られたくないので、思い切って全て独立させることに。
I couldn’t think of much, and I didn’t want to be bound by the wiring layout, so I decided to make everything independent.
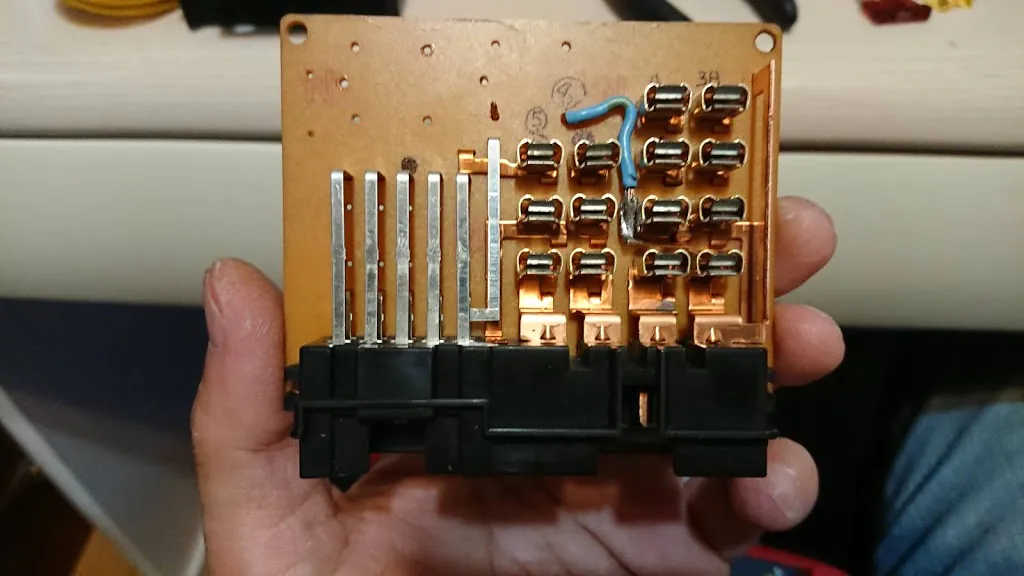
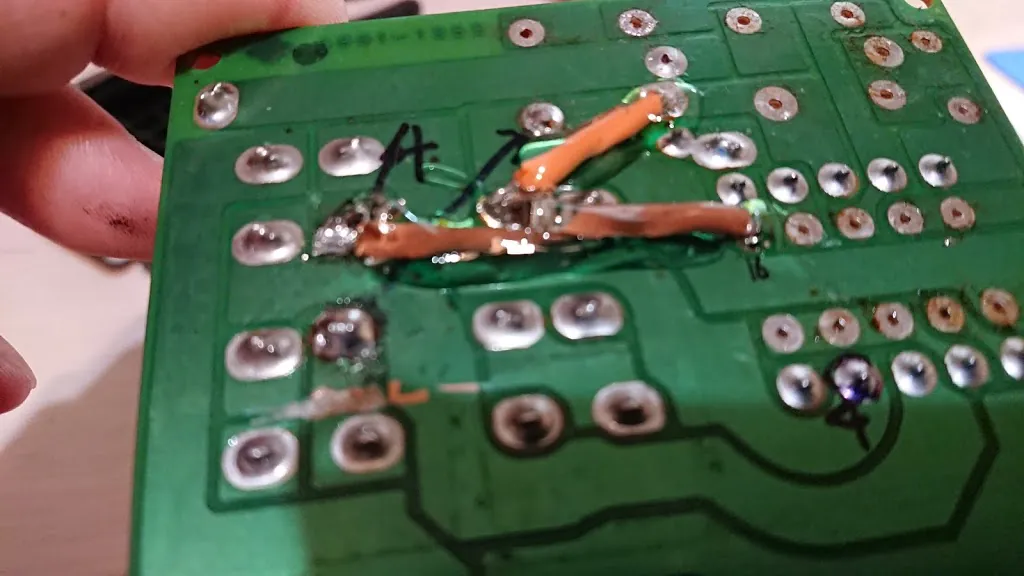
写真で見ると分かるように、端子3本が基板の表、1本が裏のパターンでつながっている。
As you can see in the photo, three terminals are connected on the front of the board, and one on the back.
手っ取り早いのは、裏面。
The quickest way is the back side.
パターンは樹脂製の基板に薄く乗っているだけなので、切削してやると簡単に除去できる。力を入れ過ぎて基板を割らないよう要注意。
The patterns are just thinly laid on a resin board, so they can be easily removed by cutting. Be careful not to break the board by applying too much force.
表面は、いったん端子を外して、それぞれを繋いでいる銅製の板をカット。この部品はあとで再利用。
On the front, remove the terminals once and cut the copper plates connecting them. This part will be reused later.
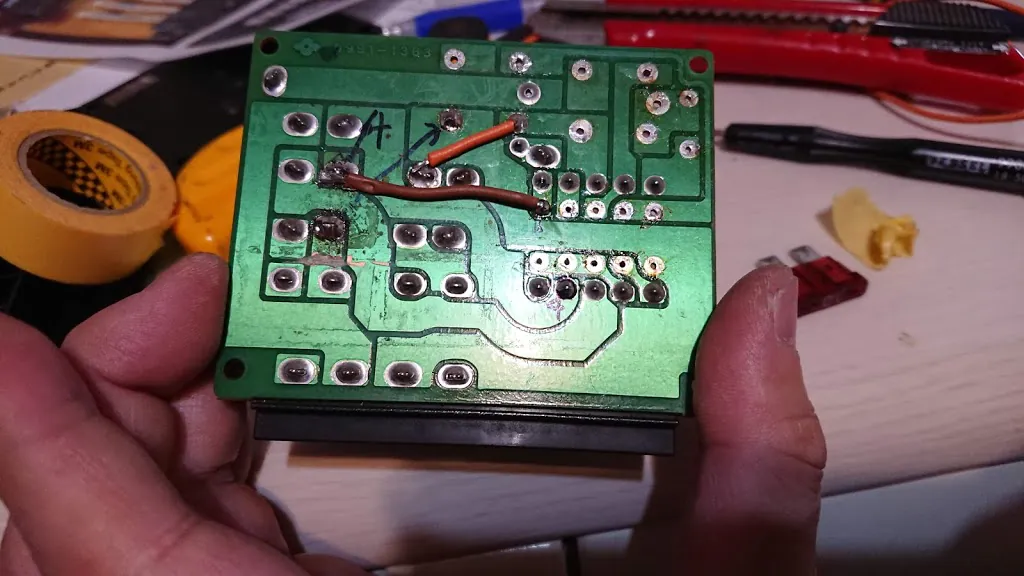
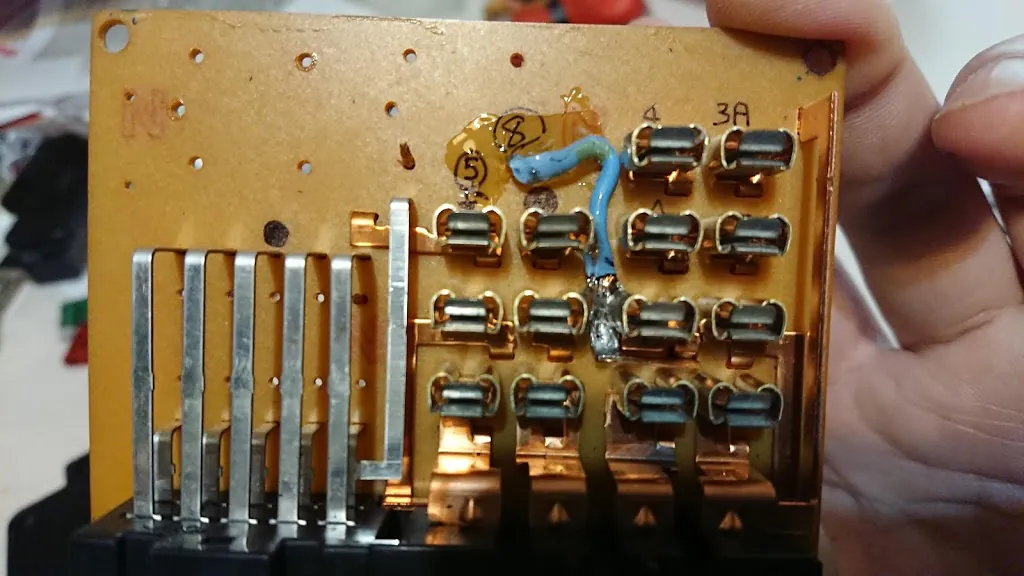
で、孤立した端子をカプラ側の端子と接続しなければならないのだが、悩みに悩んでこのようにした。
Then, the isolated terminals need to be connected to the terminals on the coupler side, but after much thought, I did it this way.
裏面でジャンプしたいところなんだけど、レイアウト的に残りの2本と取り合いになるほか、裏蓋のクリアランスがもともとギリギリなので0.75sqくらいの線も入る隙間がないのだ。
I wanted to jump on the back side, but due to the layout, it would interfere with the remaining two wires, and the clearance of the back cover is so tight that there isn’t even room for a 0.75sq wire.
なので、やや不格好だが、8番端子とこのように接続。本当であれば、銅板をカットして新しいパーツを作ってやると確実なのだが、まずは「実験段階」なので、これでお茶を濁す。
So, it’s a bit unsightly, but I connected it to terminal 8 like this. Ideally, I would cut the copper plate and make new parts, but for now, it’s just an “experimental stage,” so I settled for this.
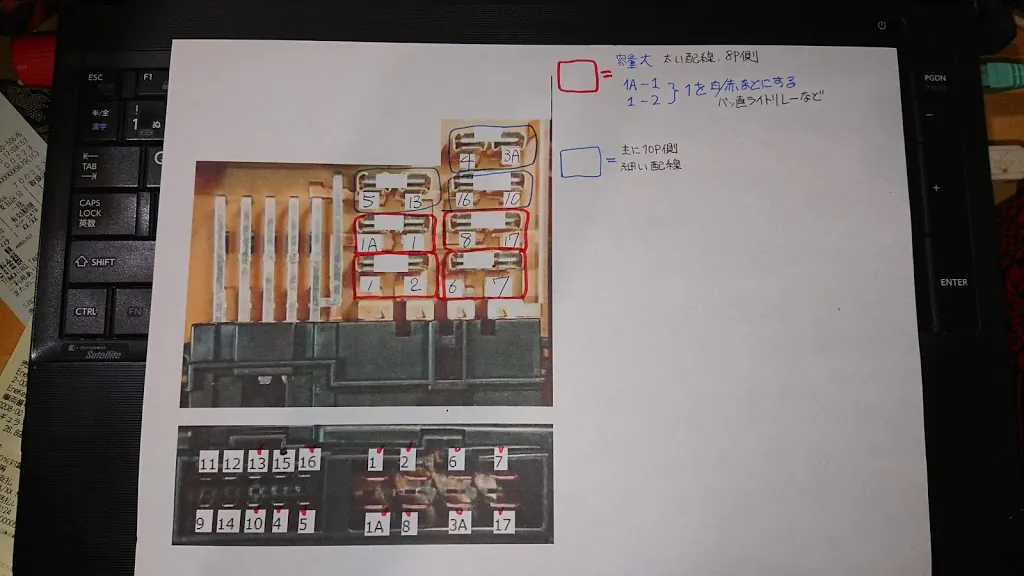
8と17を使える=8Pカプラ=太い線が使える、ということでメデタシ。
Using terminals 8 and 17 = 8P coupler = thicker wires can be used, which is good.
あとの2つは10Pカプラに逃がしてやることに。これもまた、本当は銅板を切るとかエッチングでパターンを作って、表側に移したいところだが、手持ちの材料が少なかったので、暫定的にこういう具合に。
The other two will be connected to a 10P coupler. Ideally, I would cut the copper plate or create a pattern with etching and move it to the front, but due to limited materials, I did it this way temporarily.
PSPや3DSのようなゲーム機器で使うような薄い配線があればいいんだろうけど。
Thin wiring like that used in game devices like PSP or 3DS would be ideal.
別にこのままでも悪くないのだが、振動でハンダが割れるとか配線が外れるとかしたら、これまた本末転倒な改造になる。
It’s not bad as it is, but if the solder cracks or the wiring comes loose due to vibration, it would be a counterproductive modification.
ほかの電子部品についても同じだけど、クルマやバイクに搭載するパーツは、衝撃を含む振動、結露を含む水濡れをいかに防ぐかが課題。
The same applies to other electronic parts; the challenge is how to prevent vibration including shock and moisture including condensation when installed in cars or motorcycles.
最安にして、定評のある方法が、100円ショップのグルーガン。割と良い感じだそう。
The cheapest and most reliable method is a glue gun from a 100 yen shop. It seems to work quite well.
ワタクシが選んだのが、こちら。
Here’s what I chose.
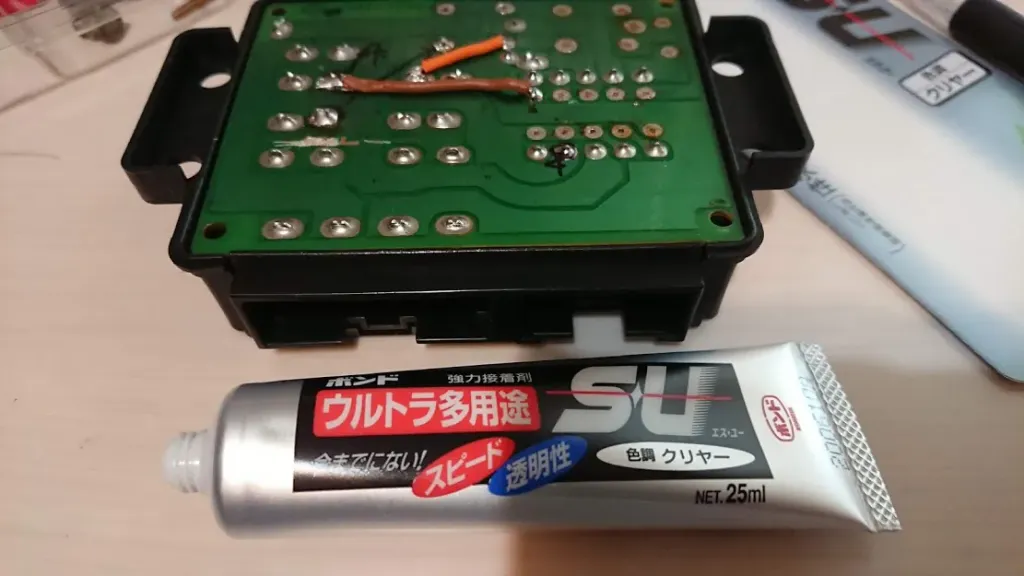
コニシ(KONISHI) ボンド ウルトラ多用途S・U クリヤー 25ml #04592
Konishi Bond Ultra Multipurpose S・U Clear 25ml #04592
ややユルい感じの透明の液体なのだが、固まるとゴム状に。
It’s a slightly loose clear liquid, but it becomes rubber-like when it solidifies.
見るほどに不格好だが、仕方あるまい…
It looks unsightly, but there’s no helping it…
完全なる自己満足の世界だ。
It’s a world of complete self-satisfaction.
これを見て「よし!オレも水冷Zのジャンクションボックスつけるぜ!」と思う物好きは居ないでしょうが、どうしても、やってみたい人はコレを見てから。
No one will see this and think, “Alright! I’ll install a junction box on my water-cooled Z too!” but if you really want to do it, check this out.
38200KFG010 ボックスASSY. ヒューズ 38200KFG010 1個 ホンダ
38200KFG010 Box ASSY. Fuse 38200KFG010 1 piece Honda [Monotaro Online]
多分、こんな感じのヒューズボックスが沢山出てるので、そちらを探した方がコンパクトで軽いハズ。
There are probably many fuse boxes like this, so finding one of those would be more compact and lighter.
あと電装系をカスタムする時、こういうのも便利そう。
Also, these seem convenient when customizing the electrical system.
デイトナ バイク用 アクセサリー電源ユニット 4系統 電源一括管理 合計20A D-UNIT(ディーユニット) 98830
Daytona Motorcycle Accessory Power Unit 4 Systems Power Management Total 20A D-UNIT 98830
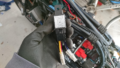
目下の悩みは、コレをどうやって搭載するか…
My current dilemma is how to install this…
今の仕様は左側の片面だけで電装系のパーツは収まったけ
ど、これ、レギュレーター、スターターリレーを移設するか、ヒューズボックスを右側にもっていかないと入らない。
The current setup fits the electrical parts on just one side, but I either have to relocate the regulator and starter relay or move the fuse box to the right side to fit this.
レギュレーターはステーターコイルからの線の長さが確定なので、あまり移せないから、スターターリレーとヒューズボックスをお隣にするか…
The regulator’s wire length from the stator coil is fixed, so it can’t be moved much. Should I place the starter relay and fuse box next to each other…
泥沼にはまりそうなので、いったん、戸棚に仕舞います(笑)。
I feel like I’m getting stuck in a quagmire, so I’ll put it in the cupboard for now (lol).
何だったんだ、この作業…
What was this task for…
コメント